
Make Your own Characters with Shape Layers like those shown here is the result of piecing together the right ingredients and knowing just how to edit select components to make them unique. The predefined shapes we’ll use are basic. The shapes we’ll create with the Pen tool are nothing extravagant. However, the method of construction and the ability to visualize the result are important. As you work your way through the chapter, the logic will fall into place and you’ll get a feel for how simple regions of sharp color, on a series of layers, can act together to create an expressive character with a unique personality.
Obviously, details like eyes or antennas are things that appear more than once on the face. Just because there are two eyes or two antennas, it doesn’t mean that you must carefully construct each instance. You’ll learn how to logically group the shape layers that make up each feature, duplicate them, and flip or alter specific details to make these features look as if they belong together on the face or head.
PART ONE: The first character
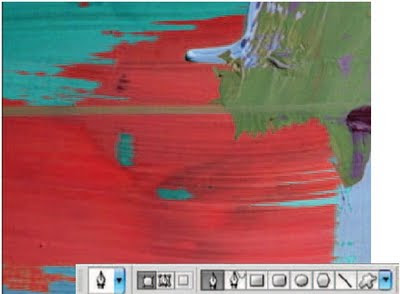
The first thing you need to do is open up the background.jpg file. This brightly colored painting provides an ideal backdrop for the bright, whimsical characters we’re about to create in this chapter. All of your shape layers will be added to this file to create a plethora of strange creatures. To get started, select the Pen tool. Then, in the Tool Options bar, ensure that the Shape Layers function is enabled. Do this by clicking on the button at the left. Press “ d ” on the keyboard to set your foreground color to black and zoom in closer on a section of the background.
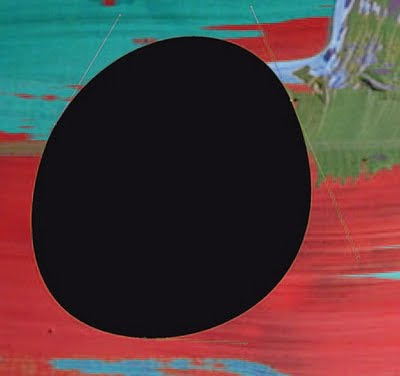
Click and drag with the Pen tool to create a curved point. Move the mouse, then click and drag again to create another curved point joined to the previous point by a line segment. Repeat this method, making your way back to the original point. Click and drag on the original starting point to close the shape. Once the shape is closed, select the Direct Selection tool. Use the Direct Selection tool to click on the individual points that make up your curved shape. When you click on a point, the Bezier handles that define that point will become visible.
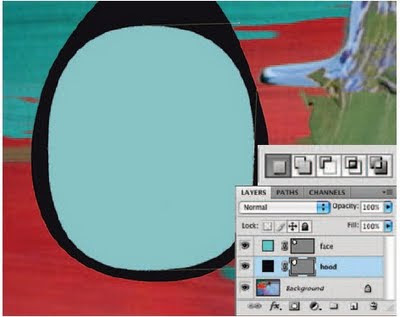
Click and drag the Bezier handles to reshape the curves and move the points with the Direct Selection tool until you have achieved the desired shape. When you’re finished, select the Pen tool again and click on the Foreground Color swatch in the toolbar to launch the picker. Choose a blue color from the picker to change the foreground color to blue. Ensure that the Create New Shape Area option is selected in the Tool Options bar, and then use the previous method to create a smaller blue shape on a new layer. Edit the points and curves with the Direct Selection tool using the previous method.
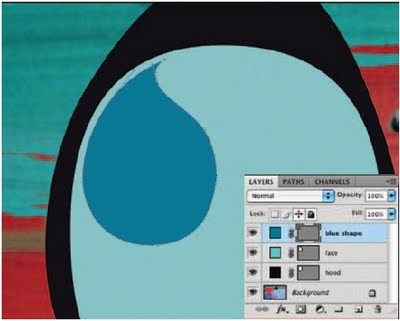
Specify a darker blue foreground color. Select the Pen tool and ensure that it is set to create a new shape layer in the Tool Options bar. This time, when starting your shape, just click once instead of clicking and dragging, then move the mouse and click and drag. This will create an initial sharp or corner point, and your second point will define the curvature of the line. Click and drag to add more curved points and then, when returning to your starting point, just click. By clicking once on the starting point, you ensure that this point remains sharp, not curved.
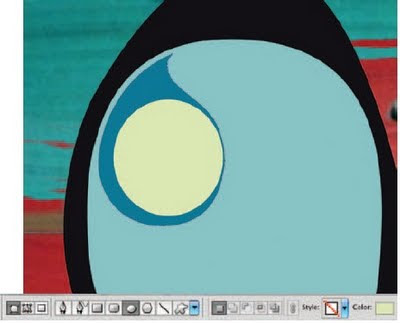
In the Tool Options bar, select the Ellipse tool and then disable the Chain-Link button by clicking on it, so that the new color we choose from the swatch in the Tool Options bar is not applied to the currently targeted shape layer. Click the Color swatch in the Tool Options bar and select a dirty yellow color from the picker. Ensure that the Create New Shape Layer option is enabled and then click and drag while holding down the Shift key to create a perfectly circular shape layer. You can reposition the entire shape layer with the Move tool.
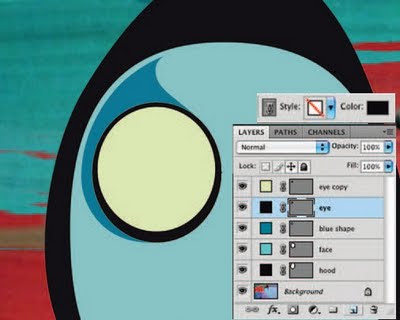
Drag the shape layer onto the Create a New Layer button in the Layers palette to duplicate it. Target the original layer (the one beneath the copy) in the Layers palette. Choose Edit > Free-Transform from the menu and drag the corner points of the box outward to increase the size, and alter the shape of the shape layer. Press the Enter key to apply the transformation. In the Tool Options bar, enable the Chain-Link button to affect the current layer. Then specify a black fill color via the swatch in the Tool Options bar.
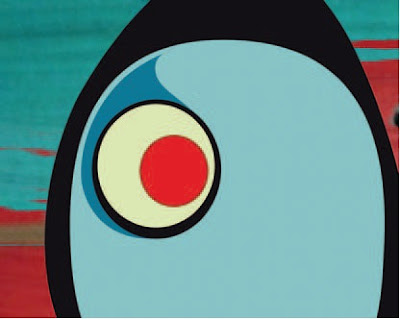
Target the top layer in the Layers palette so that your next layer will be created above it. Again, use the Ellipse tool to draw a smaller circle in his eye area . Ensure that the Create New Shape Layer option is enabled as you create the circle. Next, change the fill color of the new layer to red via the Color swatch in the Tool Options bar. With this new layer targeted, choose the stroke effect from the Layer Styles menu at the bottom of the Layers palette. Add a darker red stroke to the outside of the circle.
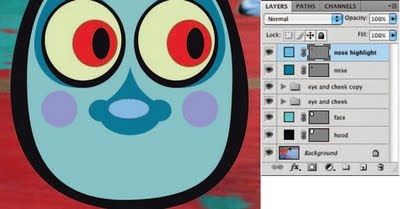
Collapse the group in the Layers palette. Use the Eyedropper tool to click on the dark blue area around his eye, sampling it as the current foreground color. Use the Pen tool to create a new shape layer in the middle of his face. Carefully draw a nose shape with the Pen tool. Take your time, clicking once to create sharp points, clicking and dragging to create curved points. Edit the shape with the Direct Selection tool wherever necessary. Next, select the Ellipse tool and draw a lighter blue ellipse over his nose on a new shape layer.
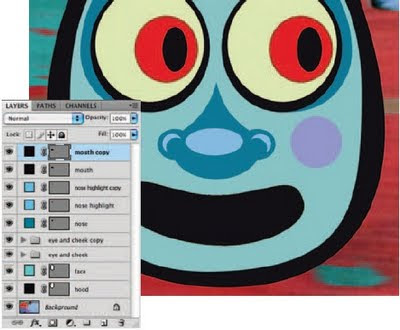
Set the foreground color to black. Select the Pen tool and ensure that the Create New Shape Area option is enabled. Draw a closed shape to indicate his mouth. Click and drag to create a series of curved points and use the Direct Selection tool to edit your points and curves until the mouth shape is looking just right. Duplicate the mouth shape layer in the Layers palette so that there are now two of them. Target the duplicate mouth layer and press the Link button in the Tool Options bar so that when you change the color, this layer will be affected.
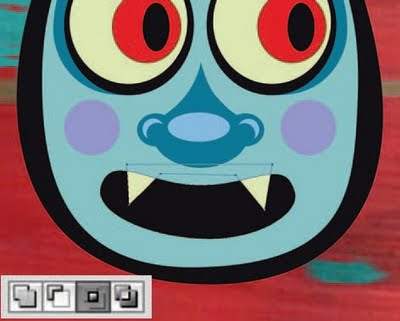
Click the Color swatch in the Tool Options bar. When the picker opens, move the mouse out over the yellow part of the eye on the canvas and then click to select this yellow as the fill color for this shape layer. Click OK and select the Pen tool. Choose the Intersect Shape Areas option in the Tool Options bar and then draw a closed shape that contains two fangs that overlap the mouth area. As you draw, you’ll see the layer content disappear and then only reappear in areas where the new shape overlaps the existing shape within the current shape layer.
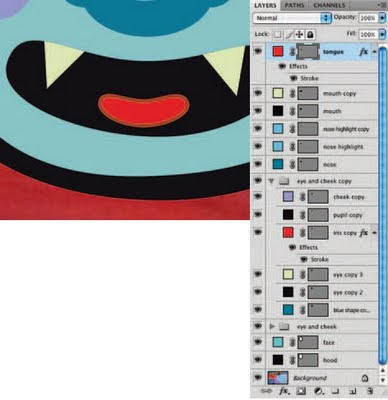
Use the Pen tool with the Create New Shape Layer option enabled to draw a tongue shape on a new shape layer that sits within his mouth on the canvas. Click the Color swatch in the Tool Options bar and when the picker opens, click on the red area of one of his eyes in the image to specify that as the fill color for your new shape layer. Expand one of your groups in the Layers palette. Find one of the layers with the stroke effect applied to it. Hold down the Alt(PC)/ Option(Mac) key and then drag the effect from that layer onto your new layer, copying it.
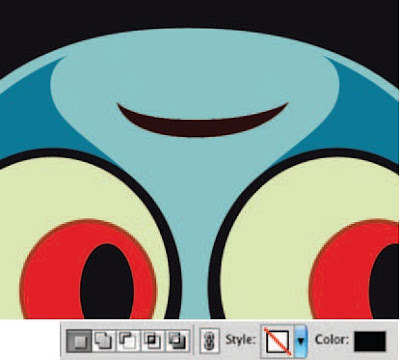
If the Chain-Link button is enabled in the Tool Options bar, disable it. Then click on the Color swatch in the Tool Options bar and select black from the picker. If you do this while the Chain-Link button is enabled, it will change the color of your tongue shape layer. Disabling it ensures that only a new shape layer will contain black. Also, ensure that you set the style setting back to none; otherwise, the next layer you create will have the previous layer’s stroke style applied to it. Use the Pen tool with the Create New Shape Layer option enabled to draw a forehead wrinkle shape.
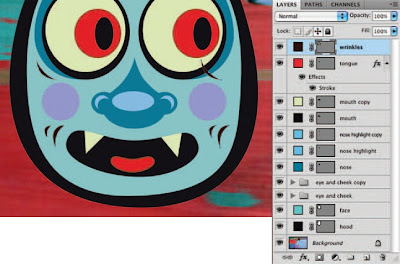
Now select the Add to Shape Area function and draw some more closed shape components to indicate wrinkles on his forehead and the left side of his face. Use the Path Selection tool to select one of the wrinkle shape components that you created at the left. Then, hold down the Shift key and click on the other wrinkle shape components at the left to select them as well. While holding down the Alt(PC)/Option(Mac) key, click on the selected shape components and drag them to the other side of the face, copying them.

Now, to flip your duplicated wrinkles over, choose Edit > Transform Path > Flip Horizontal from the menu so that they look like they belong on the right side of the face. Reposition them if necessary with the Path Selection tool. Your top layer is currently targeted in the Layers palette. Hold down the Shift key and click on the shape layer directly above the background layer. This targets the new layer, the top layer, and all layers and groups in-between. Now choose Layer > New > Group From Layers from the menu to add all of the targeted contents to a single group.
PART TWO: The second character
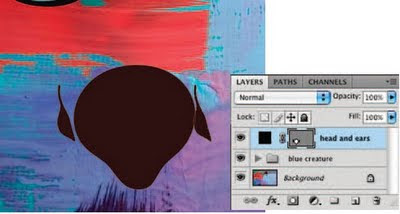
It is likely that by now you are becoming familiar with the process of creating new shape layers. So let’s put that familiarity to work again. Navigate to another area of the canvas. Use the Pen tool, set to Create New Shape Layer to draw the shape of an alien’s head. Don’t worry about the fill color of your layer at this point. Next, select the Add to Shape Area option in the Tool Options bar. Draw an ear at the left of his head. Then use the Path Selection tool to Alt(PC)/ Option(Mac) + Shift-drag his ear to the other side of the head, copying it.
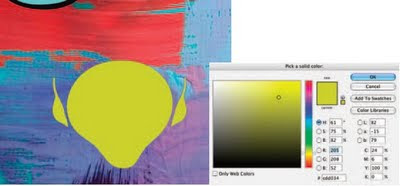
Flip the copied shape component horizontally via the same methods you’ve previously used for flipping other shape components. Use the Path Selection tool to position it exactly where you want it on the layer. Now, double-click your shape layer thumbnail in the Layers palette. This will launch the picker. Choose a new, light green fill color for your layer and click OK. You can change the fill color of any shape layer at any point by double-clicking the layer thumbnail. As you can see now, there are numerous ways to specify and edit the fill colors of your shape layers.
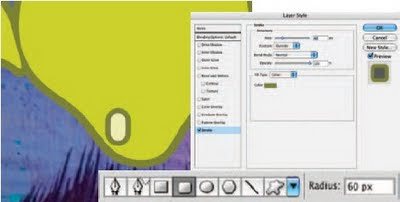
Add a stroke effect to this layer. Use a darker green color, a generous thickness, position it outside so that it surrounds the exterior of the shape components. Select the rounded rectangle shape tool in the Tool Options bar. Set the radius very high. Then click and drag to create a tooth shape on a new shape layer. Change the fill color of the layer to light yellow. This layer automatically has the previous stroke effect applied to it. Double-click the effect in the Layers palette to edit it, reducing the size of the stroke.
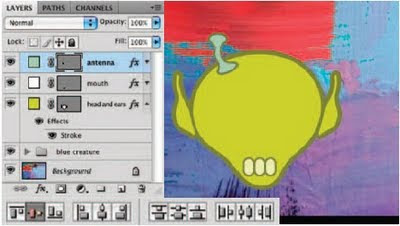
Use the Path Selection tool to select your tooth shape component and Alt(PC)/Option(Mac)-drag it to the right to copy it within the shape layer. Repeat the process again until there are three teeth on this layer. Target all three shape components and then click on the Align Vertical Centers button in the Tool Options bar to align the shape components. Use the Pen tool to create an antenna shape on the left side of the head, on a new, different colored shape layer. Ensure the Link button is disabled in the Tool Options bar, and set the style back to none in the style picker.
Ensure that your group is targeted in the Layers palette and select the Move tool. Hold down the Alt(PC)/Option(Mac) and Shift keys as you click on the canvas and drag to the right, duplicating the group and ensuring that it stays aligned vertically with the previous group. Then choose Edit > Transform > Flip Horizontal from the menu to flip the group. Use the Move tool or the arrow keys on the keyboard to adjust the positioning on the canvas if necessary. Target all of the layers and groups that make up the alien character in the Layers palette and add them to a new group.
PART THREE: The third character
Now that you’ve created two distinctly different characters out of shape layers, storing each in a group of its own, create one more for the sake of diversity. Use the Pen tool to click and drag, creating a closed object that resembles tentacles on a new shape layer. Specify a green fill color and then switch to the Ellipse tool. Ensure that the Add to Shape Area function is enabled in the Tool Options bar. Click and drag to create a large ellipse that overlaps the top of the tentacles shape on the same layer, creating a strange octopus body.

Again, as you’ve done with the previous two characters, create a series of new shape layers to add the character’s essential features and details to the file. All of the methods are the same as before. Even the mouth, although it has more teeth, can be created by using the same methods that you used to create the blue creature’s mouth earlier on. When you’re finished, target all of the shape layers that make up the octopus in the Layers palette and add them to a new group.
Now, just because your finished creatures are neatly organized into groups in the Layers palette, it doesn’t mean that you can’t add more shape layers within a group or edit existing ones. Here, new shape layers were added to the octopus group as well as the alien group. Spots were added to the tentacles of the octopus on a new shape layer and to the alien’s forehead using the same method. Each new layer was placed in the appropriate group, ensuring that the Layers palette remained organized.
PART FOUR: Duplicates and variations
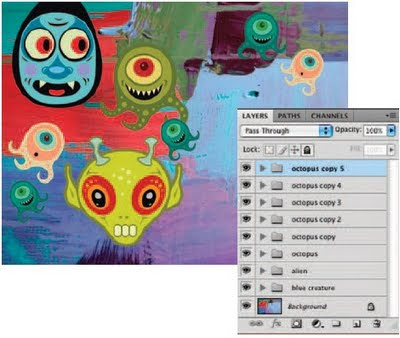
Duplicate the octopus group. Use Free- Transform to rotate, resize, and move it to another location on the canvas. Double-click individual layers within the group and change their fill colors. Delete the shape layers that make up his mouth by dragging them into the trash in the Layers palette. Then add a new shape layer that contains a small black ellipse to the group, creating a new mouth with a different facial expression. Use this method to create a number of different octopus groups on the canvas. Alter colors and shape layers as you see fit.
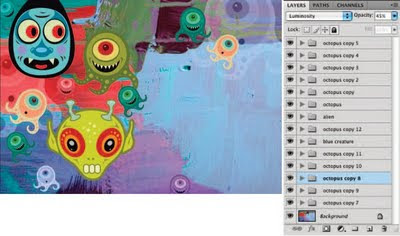
Continue to make duplicates of your groups, moving them to different areas of the canvas, and using Free-Transform to rotate and resize your groups. Move them up and down within the Layers palette so that some characters are overlapping others. Try varying blending modes of your duplicate groups here and there. Also experiment with reduced opacity to make some of them less prominent.
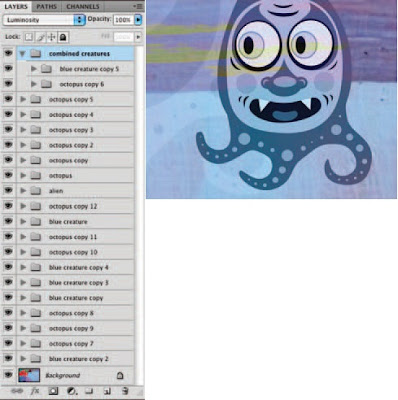
Use these methods to introduce a variety of copied alien groups into the image as well. Alter blending modes, opacity, and try disabling the visibility of some layers. Try combining some of your duplicates into groups as well. Here, this creature was created by adding a blue creature group and an octopus group into a new group. The blue creature was positioned on top of the octopus and the fill color of the octopus layer was changed to match that of the blue creature. Then, the blending mode of the new group was changed to luminosity.
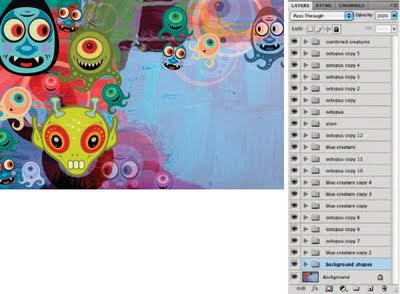
Now that you’re finished with the character groups, apply the same methods you’ve used so far to create some shape layers out of basic shape combinations. Use the Subtract and Add to Shape Area options freely. Also, have some fun with different blending modes, color fills, and layer opacity settings. Drag all of the new shape layers beneath the character groups in the Layers palette, so that the new shape layers are used to enhance the painted background rather than overlapping the creatures. Place the new shape layers in a group of their own, just to keep the Layers palette organized.
Examining your shape layer masterpiece
Now that you’re finished creating the image, let’s take a final look at some of the exceptional features and techniques involved.
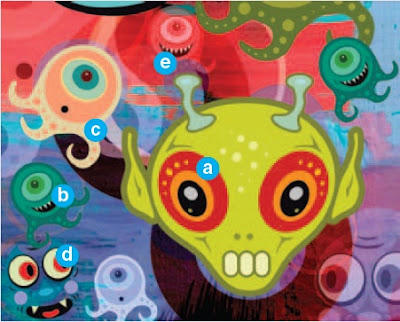
a By duplicating a group of features, you’re not only cutting your work in half, but you are effectively creating an identical set of features for the other side of the face.
b One great thing about shape layers is that you can change the fill color at any point, so duplicate groups can look diverse rather than monotonous.
c Replacing something as simple as the shape layers that make up the mouth in a duplicate group can completely change the emotion of your character.
d When you’re spreading duplicate groups around the canvas, disabling the visibility of base layers within a group can result in ghostly, floating creatures rather than identical duplicates.
e Experimenting with blending modes allows you to use your characters in subtle ways. In this case, the creature enhances the background using only its luminosity.
Obviously, details like eyes or antennas are things that appear more than once on the face. Just because there are two eyes or two antennas, it doesn’t mean that you must carefully construct each instance. You’ll learn how to logically group the shape layers that make up each feature, duplicate them, and flip or alter specific details to make these features look as if they belong together on the face or head.
PART ONE: The first character

The first thing you need to do is open up the background.jpg file. This brightly colored painting provides an ideal backdrop for the bright, whimsical characters we’re about to create in this chapter. All of your shape layers will be added to this file to create a plethora of strange creatures. To get started, select the Pen tool. Then, in the Tool Options bar, ensure that the Shape Layers function is enabled. Do this by clicking on the button at the left. Press “ d ” on the keyboard to set your foreground color to black and zoom in closer on a section of the background.

Click and drag with the Pen tool to create a curved point. Move the mouse, then click and drag again to create another curved point joined to the previous point by a line segment. Repeat this method, making your way back to the original point. Click and drag on the original starting point to close the shape. Once the shape is closed, select the Direct Selection tool. Use the Direct Selection tool to click on the individual points that make up your curved shape. When you click on a point, the Bezier handles that define that point will become visible.

Click and drag the Bezier handles to reshape the curves and move the points with the Direct Selection tool until you have achieved the desired shape. When you’re finished, select the Pen tool again and click on the Foreground Color swatch in the toolbar to launch the picker. Choose a blue color from the picker to change the foreground color to blue. Ensure that the Create New Shape Area option is selected in the Tool Options bar, and then use the previous method to create a smaller blue shape on a new layer. Edit the points and curves with the Direct Selection tool using the previous method.

Specify a darker blue foreground color. Select the Pen tool and ensure that it is set to create a new shape layer in the Tool Options bar. This time, when starting your shape, just click once instead of clicking and dragging, then move the mouse and click and drag. This will create an initial sharp or corner point, and your second point will define the curvature of the line. Click and drag to add more curved points and then, when returning to your starting point, just click. By clicking once on the starting point, you ensure that this point remains sharp, not curved.

In the Tool Options bar, select the Ellipse tool and then disable the Chain-Link button by clicking on it, so that the new color we choose from the swatch in the Tool Options bar is not applied to the currently targeted shape layer. Click the Color swatch in the Tool Options bar and select a dirty yellow color from the picker. Ensure that the Create New Shape Layer option is enabled and then click and drag while holding down the Shift key to create a perfectly circular shape layer. You can reposition the entire shape layer with the Move tool.

Drag the shape layer onto the Create a New Layer button in the Layers palette to duplicate it. Target the original layer (the one beneath the copy) in the Layers palette. Choose Edit > Free-Transform from the menu and drag the corner points of the box outward to increase the size, and alter the shape of the shape layer. Press the Enter key to apply the transformation. In the Tool Options bar, enable the Chain-Link button to affect the current layer. Then specify a black fill color via the swatch in the Tool Options bar.

Target the top layer in the Layers palette so that your next layer will be created above it. Again, use the Ellipse tool to draw a smaller circle in his eye area . Ensure that the Create New Shape Layer option is enabled as you create the circle. Next, change the fill color of the new layer to red via the Color swatch in the Tool Options bar. With this new layer targeted, choose the stroke effect from the Layer Styles menu at the bottom of the Layers palette. Add a darker red stroke to the outside of the circle.

Collapse the group in the Layers palette. Use the Eyedropper tool to click on the dark blue area around his eye, sampling it as the current foreground color. Use the Pen tool to create a new shape layer in the middle of his face. Carefully draw a nose shape with the Pen tool. Take your time, clicking once to create sharp points, clicking and dragging to create curved points. Edit the shape with the Direct Selection tool wherever necessary. Next, select the Ellipse tool and draw a lighter blue ellipse over his nose on a new shape layer.

Set the foreground color to black. Select the Pen tool and ensure that the Create New Shape Area option is enabled. Draw a closed shape to indicate his mouth. Click and drag to create a series of curved points and use the Direct Selection tool to edit your points and curves until the mouth shape is looking just right. Duplicate the mouth shape layer in the Layers palette so that there are now two of them. Target the duplicate mouth layer and press the Link button in the Tool Options bar so that when you change the color, this layer will be affected.

Click the Color swatch in the Tool Options bar. When the picker opens, move the mouse out over the yellow part of the eye on the canvas and then click to select this yellow as the fill color for this shape layer. Click OK and select the Pen tool. Choose the Intersect Shape Areas option in the Tool Options bar and then draw a closed shape that contains two fangs that overlap the mouth area. As you draw, you’ll see the layer content disappear and then only reappear in areas where the new shape overlaps the existing shape within the current shape layer.

Use the Pen tool with the Create New Shape Layer option enabled to draw a tongue shape on a new shape layer that sits within his mouth on the canvas. Click the Color swatch in the Tool Options bar and when the picker opens, click on the red area of one of his eyes in the image to specify that as the fill color for your new shape layer. Expand one of your groups in the Layers palette. Find one of the layers with the stroke effect applied to it. Hold down the Alt(PC)/ Option(Mac) key and then drag the effect from that layer onto your new layer, copying it.

If the Chain-Link button is enabled in the Tool Options bar, disable it. Then click on the Color swatch in the Tool Options bar and select black from the picker. If you do this while the Chain-Link button is enabled, it will change the color of your tongue shape layer. Disabling it ensures that only a new shape layer will contain black. Also, ensure that you set the style setting back to none; otherwise, the next layer you create will have the previous layer’s stroke style applied to it. Use the Pen tool with the Create New Shape Layer option enabled to draw a forehead wrinkle shape.

Now select the Add to Shape Area function and draw some more closed shape components to indicate wrinkles on his forehead and the left side of his face. Use the Path Selection tool to select one of the wrinkle shape components that you created at the left. Then, hold down the Shift key and click on the other wrinkle shape components at the left to select them as well. While holding down the Alt(PC)/Option(Mac) key, click on the selected shape components and drag them to the other side of the face, copying them.

Now, to flip your duplicated wrinkles over, choose Edit > Transform Path > Flip Horizontal from the menu so that they look like they belong on the right side of the face. Reposition them if necessary with the Path Selection tool. Your top layer is currently targeted in the Layers palette. Hold down the Shift key and click on the shape layer directly above the background layer. This targets the new layer, the top layer, and all layers and groups in-between. Now choose Layer > New > Group From Layers from the menu to add all of the targeted contents to a single group.
PART TWO: The second character

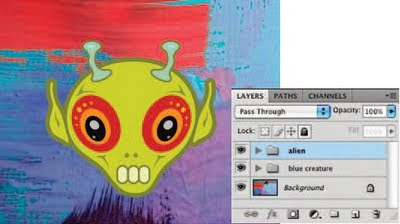
It is likely that by now you are becoming familiar with the process of creating new shape layers. So let’s put that familiarity to work again. Navigate to another area of the canvas. Use the Pen tool, set to Create New Shape Layer to draw the shape of an alien’s head. Don’t worry about the fill color of your layer at this point. Next, select the Add to Shape Area option in the Tool Options bar. Draw an ear at the left of his head. Then use the Path Selection tool to Alt(PC)/ Option(Mac) + Shift-drag his ear to the other side of the head, copying it.

Flip the copied shape component horizontally via the same methods you’ve previously used for flipping other shape components. Use the Path Selection tool to position it exactly where you want it on the layer. Now, double-click your shape layer thumbnail in the Layers palette. This will launch the picker. Choose a new, light green fill color for your layer and click OK. You can change the fill color of any shape layer at any point by double-clicking the layer thumbnail. As you can see now, there are numerous ways to specify and edit the fill colors of your shape layers.

Add a stroke effect to this layer. Use a darker green color, a generous thickness, position it outside so that it surrounds the exterior of the shape components. Select the rounded rectangle shape tool in the Tool Options bar. Set the radius very high. Then click and drag to create a tooth shape on a new shape layer. Change the fill color of the layer to light yellow. This layer automatically has the previous stroke effect applied to it. Double-click the effect in the Layers palette to edit it, reducing the size of the stroke.

Use the Path Selection tool to select your tooth shape component and Alt(PC)/Option(Mac)-drag it to the right to copy it within the shape layer. Repeat the process again until there are three teeth on this layer. Target all three shape components and then click on the Align Vertical Centers button in the Tool Options bar to align the shape components. Use the Pen tool to create an antenna shape on the left side of the head, on a new, different colored shape layer. Ensure the Link button is disabled in the Tool Options bar, and set the style back to none in the style picker.

Ensure that your group is targeted in the Layers palette and select the Move tool. Hold down the Alt(PC)/Option(Mac) and Shift keys as you click on the canvas and drag to the right, duplicating the group and ensuring that it stays aligned vertically with the previous group. Then choose Edit > Transform > Flip Horizontal from the menu to flip the group. Use the Move tool or the arrow keys on the keyboard to adjust the positioning on the canvas if necessary. Target all of the layers and groups that make up the alien character in the Layers palette and add them to a new group.
PART THREE: The third character

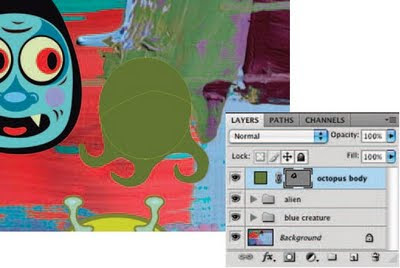
Now that you’ve created two distinctly different characters out of shape layers, storing each in a group of its own, create one more for the sake of diversity. Use the Pen tool to click and drag, creating a closed object that resembles tentacles on a new shape layer. Specify a green fill color and then switch to the Ellipse tool. Ensure that the Add to Shape Area function is enabled in the Tool Options bar. Click and drag to create a large ellipse that overlaps the top of the tentacles shape on the same layer, creating a strange octopus body.

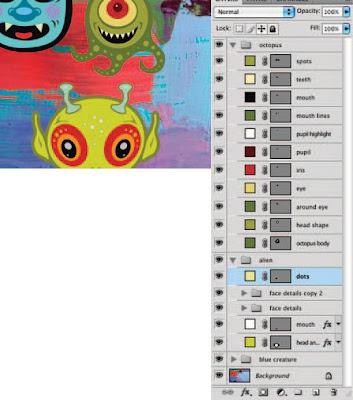
Again, as you’ve done with the previous two characters, create a series of new shape layers to add the character’s essential features and details to the file. All of the methods are the same as before. Even the mouth, although it has more teeth, can be created by using the same methods that you used to create the blue creature’s mouth earlier on. When you’re finished, target all of the shape layers that make up the octopus in the Layers palette and add them to a new group.

Now, just because your finished creatures are neatly organized into groups in the Layers palette, it doesn’t mean that you can’t add more shape layers within a group or edit existing ones. Here, new shape layers were added to the octopus group as well as the alien group. Spots were added to the tentacles of the octopus on a new shape layer and to the alien’s forehead using the same method. Each new layer was placed in the appropriate group, ensuring that the Layers palette remained organized.
PART FOUR: Duplicates and variations

Duplicate the octopus group. Use Free- Transform to rotate, resize, and move it to another location on the canvas. Double-click individual layers within the group and change their fill colors. Delete the shape layers that make up his mouth by dragging them into the trash in the Layers palette. Then add a new shape layer that contains a small black ellipse to the group, creating a new mouth with a different facial expression. Use this method to create a number of different octopus groups on the canvas. Alter colors and shape layers as you see fit.

Continue to make duplicates of your groups, moving them to different areas of the canvas, and using Free-Transform to rotate and resize your groups. Move them up and down within the Layers palette so that some characters are overlapping others. Try varying blending modes of your duplicate groups here and there. Also experiment with reduced opacity to make some of them less prominent.

Use these methods to introduce a variety of copied alien groups into the image as well. Alter blending modes, opacity, and try disabling the visibility of some layers. Try combining some of your duplicates into groups as well. Here, this creature was created by adding a blue creature group and an octopus group into a new group. The blue creature was positioned on top of the octopus and the fill color of the octopus layer was changed to match that of the blue creature. Then, the blending mode of the new group was changed to luminosity.

Now that you’re finished with the character groups, apply the same methods you’ve used so far to create some shape layers out of basic shape combinations. Use the Subtract and Add to Shape Area options freely. Also, have some fun with different blending modes, color fills, and layer opacity settings. Drag all of the new shape layers beneath the character groups in the Layers palette, so that the new shape layers are used to enhance the painted background rather than overlapping the creatures. Place the new shape layers in a group of their own, just to keep the Layers palette organized.
Examining your shape layer masterpiece
Now that you’re finished creating the image, let’s take a final look at some of the exceptional features and techniques involved.

a By duplicating a group of features, you’re not only cutting your work in half, but you are effectively creating an identical set of features for the other side of the face.
b One great thing about shape layers is that you can change the fill color at any point, so duplicate groups can look diverse rather than monotonous.
c Replacing something as simple as the shape layers that make up the mouth in a duplicate group can completely change the emotion of your character.
d When you’re spreading duplicate groups around the canvas, disabling the visibility of base layers within a group can result in ghostly, floating creatures rather than identical duplicates.
e Experimenting with blending modes allows you to use your characters in subtle ways. In this case, the creature enhances the background using only its luminosity.
+android+porn+app+sex+%5B4%5D.png)


0 komentar:
Posting Komentar