
Before you waste excessive time on trying to repair a messed up installation of Windows, I should say that it’s normal to re-install your operating system once a year or even more often if you install and uninstall a lot of software. Rather than spending hours on fixing and tuning Windows, it’s often faster to make sure all your data is backed up and simply reinstall.
If you insist, however, follow the steps outlined below to troubleshoot and fix your performance issues.
Perform General Software Maintenance
If your machine is seriously lagging, perform the maintenance steps described above first. In other words, get rid of temporary files, uninstall programs you no longer need and defragment your hard drive. If it’s not too bad, start with driver and Windows updates and then do system maintenance. If you can barely do anything, however, proceed to Log Into Windows Safe Mode to troubleshoot the cause of your lag. You can also perform most maintenance steps from Safe Mode.
Perform General Hardware Maintenance
This step is underestimated. Not only can overheating significantly decrease your system performance, it’s also possible that cables became loose or hardware is starting to fail.
For general maintenance, turn off your computer and ground yourself as instructed above under Physical Hardware C. Then perform the following steps:
When you’re done, re-assemble everything and proceed to boot the computer into safe mode and continue the list of actions below.
If you suspect a hardware issue, you may want to remove and eventually replace hardware components one by one and see whether this has an impact on the computer’s performance.
Log Into Windows Safe Mode
Windows’ Safe Mode is a boot option that only loads the operating system with absolutely necessary basic files and drivers. It is generally used to troubleshoot issues in Windows, as many components, such as graphic drivers or software that automatically start with Windows, are not loaded.
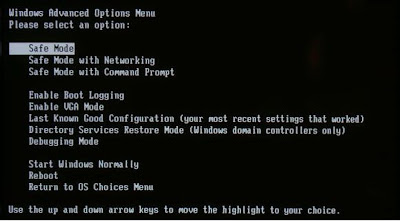
To start in Safe Mode you need to reboot your computer. Repeatedly and gently tab the > F8 key as Windows begins to boot. If you see the Windows logo, you missed the right time point; just start over. Once you see > Advanced Boot Options you know that it worked. Use the > arrow keys on your keyboard to select > Safe Mode from the options and press > Enter to boot into Safe Mode.
If your computer no longer appears sluggish when you are in Safe Mode, you can assume that your hardware is fine. A trouble-free Safe Mode is an indicator that a software issue is the source of problems you normally see. There are still many candidates, for example a driver or software conflict, malware, or simply too many programs launching at startup.
Read the article How To Start In Windows Safe Mode & Its Uses for more background information Explained article on how to use the Windows Safe Mode as a troubleshooting tool.
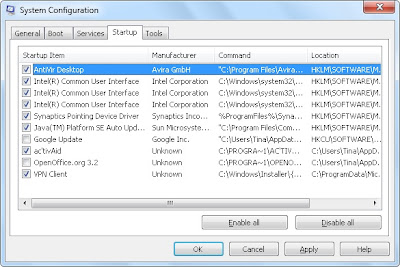
Remove Software from Startup
This will free up RAM and it helps to make your system more responsive. The steps you need to take are explained in the above chapter Free RAM by Uncluttering Windows Startup.
Malware Scan and Removal
Upgrade your antivirus program (virus definitions) and run a thorough scan. Also download at least one spyware and/or adware scanner and run it. Software recommendations can be found in the above chapter.
Increase Virtual Memory
As explained above, Virtual Memory is a way for Windows to deal with an overloaded RAM. Memory of open programs that are not actively used is outsourced to the hard drive. If you are not able to upgrade your RAM, you can potentially increase your system performance by increasing the amount of Virtual Memory Windows can use. What you do is increase the Paging File size, which defines the amount of Virtual Memory that can be used once the physical RAM is exhausted.
I have mentioned previously that hard drives are very slow compared to other media, such as solid state storage devices like USB flash drives. Rather than make more Virtual Memory available on your hard drive, you can instead allocate memory storage space from your flash drive, i.e. extend your RAM with a fast data storage medium. Long-term it’s a better bet to simply buy more RAM, but if you need a short-term boost this hack can work for you.
Windows 7
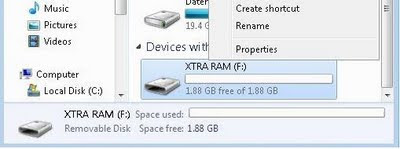
In Windows 7 the feature is called ReadyBoost and you can directly access it through the properties menu of your thumb drive. Go to > Start > Computer and scroll down to > Devices with Removable Storage. Right-click on your thumb drive and select > Properties from the menu.
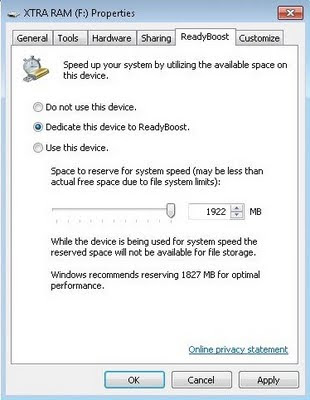
Switch to the > ReadyBoost tab and dedicate as much of the device to ReadyBoost as you need. Click > Apply to save the changes and wait as ReadyBoost configures the cache.
You will subsequently see the blocked out space under > Computer.

Windows 7 can handle up to eight flash drives and a total of 256 GB of Virtual Memory. However, not all flash drives satisfy the required performance characteristics’ to work with ReadyBoost. If this is the case, you will be warned.
Windows XP
Go to > Start > Control Panel > System > Advanced tab, in the > Performance category click > Properties, switch to the > Advanced tab, and under > Virtual Memory click > Change. Instead of selecting a hard drive, you can now mark a connected USB thumb drive and allocate space from this storage medium. Now take the number listed under > Space available and subtract 5 MB. Enter the resulting number under both > Initial size (MB) and > Maximum size (MB).
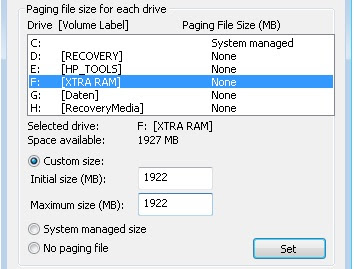
Click > Set and > OK to save changes, close all windows, and reboot your computer. Avoid removing the thumb drive to prevent damage.
Please note that Windows XP supports a maximum of 4096 MB in Virtual Memory.
The Virtual Memory / ReadyBoost trick was also featured in The Office Worker’s 101 Guide to a USB Thumb Drive.
Upgrade Your RAM
When you have exhausted all optimization steps in terms of software, you should consider upgrading your hardware. For both desktop computers and laptops a RAM upgrade is a cheap and easy way to boost system performance.
Before you head out to buy new RAM, however, be sure to know what you need. There are different types of RAM modules, not all will fit into your computer, and modules from different manufacturers or with differing performance should not be mixed. Besides, the memory slots in your computer are limited, and so is the maximum amount of RAM your operating system supports. Hence, before you buy anything smarten up and figure out what you need.
If you insist, however, follow the steps outlined below to troubleshoot and fix your performance issues.
Perform General Software Maintenance
If your machine is seriously lagging, perform the maintenance steps described above first. In other words, get rid of temporary files, uninstall programs you no longer need and defragment your hard drive. If it’s not too bad, start with driver and Windows updates and then do system maintenance. If you can barely do anything, however, proceed to Log Into Windows Safe Mode to troubleshoot the cause of your lag. You can also perform most maintenance steps from Safe Mode.
Perform General Hardware Maintenance
This step is underestimated. Not only can overheating significantly decrease your system performance, it’s also possible that cables became loose or hardware is starting to fail.
For general maintenance, turn off your computer and ground yourself as instructed above under Physical Hardware C. Then perform the following steps:
- Clean the fans and power supply from dirt and dust.
- Make sure all cables are connected properly.
- Control whether all cards and RAM firmly sit in their slots.
When you’re done, re-assemble everything and proceed to boot the computer into safe mode and continue the list of actions below.
If you suspect a hardware issue, you may want to remove and eventually replace hardware components one by one and see whether this has an impact on the computer’s performance.
Log Into Windows Safe Mode
Windows’ Safe Mode is a boot option that only loads the operating system with absolutely necessary basic files and drivers. It is generally used to troubleshoot issues in Windows, as many components, such as graphic drivers or software that automatically start with Windows, are not loaded.
To start in Safe Mode you need to reboot your computer. Repeatedly and gently tab the > F8 key as Windows begins to boot. If you see the Windows logo, you missed the right time point; just start over. Once you see > Advanced Boot Options you know that it worked. Use the > arrow keys on your keyboard to select > Safe Mode from the options and press > Enter to boot into Safe Mode.

If your computer no longer appears sluggish when you are in Safe Mode, you can assume that your hardware is fine. A trouble-free Safe Mode is an indicator that a software issue is the source of problems you normally see. There are still many candidates, for example a driver or software conflict, malware, or simply too many programs launching at startup.
Read the article How To Start In Windows Safe Mode & Its Uses for more background information Explained article on how to use the Windows Safe Mode as a troubleshooting tool.
Remove Software from Startup
This will free up RAM and it helps to make your system more responsive. The steps you need to take are explained in the above chapter Free RAM by Uncluttering Windows Startup.
Malware Scan and Removal
Upgrade your antivirus program (virus definitions) and run a thorough scan. Also download at least one spyware and/or adware scanner and run it. Software recommendations can be found in the above chapter.

Increase Virtual Memory
As explained above, Virtual Memory is a way for Windows to deal with an overloaded RAM. Memory of open programs that are not actively used is outsourced to the hard drive. If you are not able to upgrade your RAM, you can potentially increase your system performance by increasing the amount of Virtual Memory Windows can use. What you do is increase the Paging File size, which defines the amount of Virtual Memory that can be used once the physical RAM is exhausted.
I have mentioned previously that hard drives are very slow compared to other media, such as solid state storage devices like USB flash drives. Rather than make more Virtual Memory available on your hard drive, you can instead allocate memory storage space from your flash drive, i.e. extend your RAM with a fast data storage medium. Long-term it’s a better bet to simply buy more RAM, but if you need a short-term boost this hack can work for you.
Windows 7
In Windows 7 the feature is called ReadyBoost and you can directly access it through the properties menu of your thumb drive. Go to > Start > Computer and scroll down to > Devices with Removable Storage. Right-click on your thumb drive and select > Properties from the menu.

Switch to the > ReadyBoost tab and dedicate as much of the device to ReadyBoost as you need. Click > Apply to save the changes and wait as ReadyBoost configures the cache.

You will subsequently see the blocked out space under > Computer.

Windows 7 can handle up to eight flash drives and a total of 256 GB of Virtual Memory. However, not all flash drives satisfy the required performance characteristics’ to work with ReadyBoost. If this is the case, you will be warned.
Windows XP
Go to > Start > Control Panel > System > Advanced tab, in the > Performance category click > Properties, switch to the > Advanced tab, and under > Virtual Memory click > Change. Instead of selecting a hard drive, you can now mark a connected USB thumb drive and allocate space from this storage medium. Now take the number listed under > Space available and subtract 5 MB. Enter the resulting number under both > Initial size (MB) and > Maximum size (MB).

Click > Set and > OK to save changes, close all windows, and reboot your computer. Avoid removing the thumb drive to prevent damage.
Please note that Windows XP supports a maximum of 4096 MB in Virtual Memory.
The Virtual Memory / ReadyBoost trick was also featured in The Office Worker’s 101 Guide to a USB Thumb Drive.
Upgrade Your RAM
When you have exhausted all optimization steps in terms of software, you should consider upgrading your hardware. For both desktop computers and laptops a RAM upgrade is a cheap and easy way to boost system performance.
Before you head out to buy new RAM, however, be sure to know what you need. There are different types of RAM modules, not all will fit into your computer, and modules from different manufacturers or with differing performance should not be mixed. Besides, the memory slots in your computer are limited, and so is the maximum amount of RAM your operating system supports. Hence, before you buy anything smarten up and figure out what you need.
+android+porn+app+sex+%5B4%5D.png)


2 komentar:
nice information of computer technology. Visit you through this blog my friend.
thank for the visit my friend
Posting Komentar