
Let's start+ Create a Landscape
To begin, create a new document (file>new) with an image size of 1600 x 1600 px and 300dpi. Name it heaven can wait and click OK. To create the landscape open the file sky.jpg and dragand-drop it with the Move Tool [v] in to your new document. Do the same with ground.jpg. To keep everything straight, it is useful to rename the layers by double clicking on the name in the layers panel and changing it to something useful.

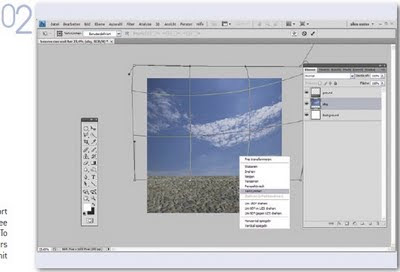
Dynamic
To get a more dynamic sky you have to distort the clouds (edit>transform>distort). You will see a frame with eight markers around the layer. To distort the image you can drag the corner markers and stretch them. To apply the transformation, hit Enter.
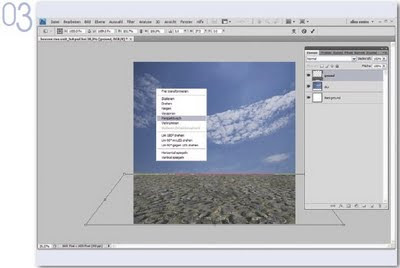
Perspective
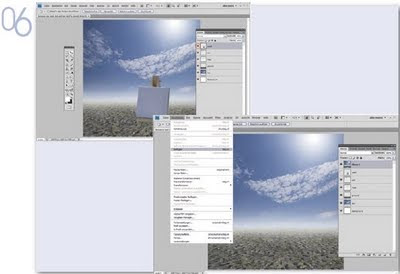
In the same way you add perspective to the ground (edit>transform>perspective), activate the ground-layer and drag the corner markers to correct the perspective (see figure). This will momentarily render the image very muddy, but after applying the transformation it will become clear.
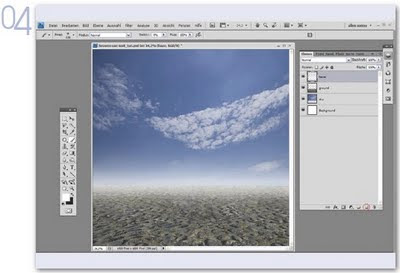
More depth
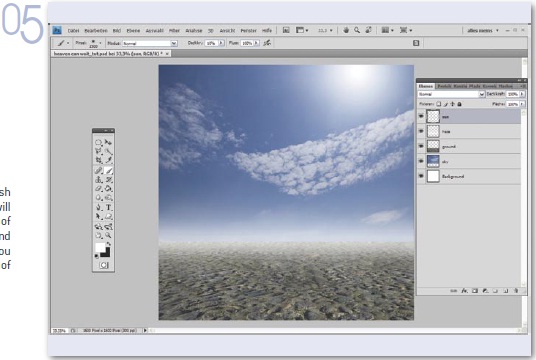
The next step is to create a layer for the haze. Click on the new layer button in the layers palette and rename it. Take a white brush with 0% hardness and an opacity <10% and paint along the horizon.
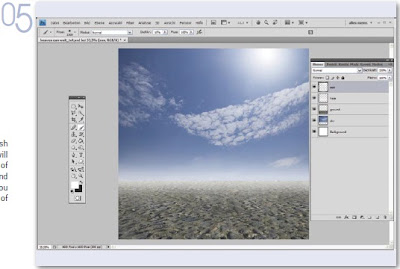
Let the sun shine
Create a new layer for the sun, using a white brush with 200px and 100% opacity. Your first click will be the center of the sun. Now, hold the position of your brush and change the brush's diameter and opacity by pressing the number keys and [#]. You will always need one click, then followed by one of the settings:
• 600px – 80%
• 1000px – 60%
• 1500px – 40%
• 2500px – 10%
Add the easel+Prepare the Canvas
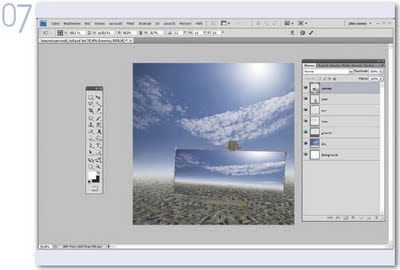
Open the file easel.png and add it to your image using the Move Tool [v]. For the next step, you have to hide this layer temporarily by clicking on the eye-icon. Make sure that your sun-layer is activated and first go to Select>All, then Edit>Copy Merged and finally Edit>Paste. You can also use the shortcut [Strg]+[Shift]+[Alt]+[e] to copy the visible layers. Name this new layer canvas and set it on the top of the layer's palette.
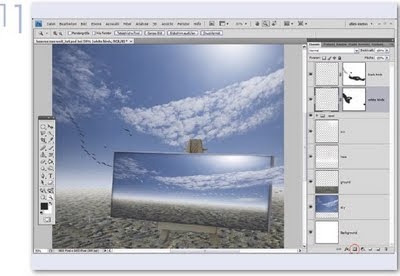
Build the Canvas
Now it is time to unhide the easel and transform the canvas with Edit>Free transform. You also can use [Strg]+[t] and drop down the menu by clicking the right mouse button to add perspective to the canvas.
Frame
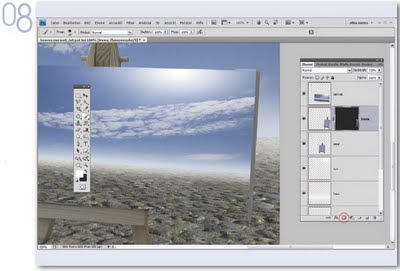
To build the canvas’s frame duplicate the easellayer and move [v] the duplicated layer to the right edge of the canvas (see figure). Create a black layer mask by holding down the [Alt]-key while clicking on the Add Layer Mask icon. All pixels in this layer are hidden now. Using a white brush, you can paint the parts you want to keep in your image. Make sure that the layer mask is activated. In the same way you can build the frame on the top of the canvas.
Canvas-look+Connection
To get a typical canvas-look, go to Filter>Texture>Texturizer and choose Canvas, Scaling 91 and Relief 1. Create a Clipping Mask above the canvas (layer>new, activiate clipping mask) and use the Brush Tool to paint a shadow around it. Use a dark gray brush with a 40% opacity. In this step you will build a connection between the two images and let the clouds fly off the canvas. Duplicate the canvas-layer, and put it on the top of the layers palette. Then, move the clouds towards their correct position (reduce opacity for a better view). As in step 10, you create a black layer mask and use a brush to paint the clouds into your image.

Extract the birds
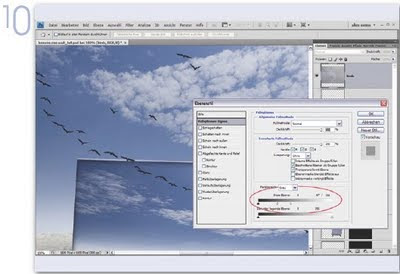
Now, open the file birds.jpg and add it to your image. You can get a transparent background by choosing blending options (double click in the layer). Slide the white triangle to the left until the sky in the image is completely gone. Split the sliders by holding the [Alt]-key to make a more accurate attempt and then click OK. To use this layer for the next step you have to create a new layer below the birds and choose Merge down.
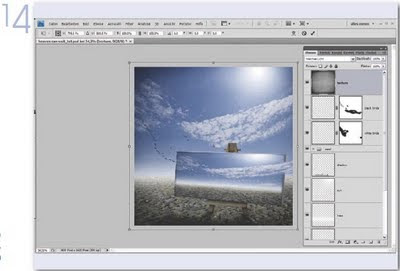
Let them fly
With [Strg]+[t] you can transform the birds like you see it in the figure. To get the white birds, you have to duplicate and invert [Strg]+[i] this layer. Create white layer masks for both bird-layers by clicking on the Add Layer Mask icon. By using a black brush you can hide the parts you do not need.
Shadow
To get a more realistic look, add a shadow on the ground. Create a new layer below the easel-layer and use a dark gray brush with 0% hardness and 60% opacity to paint the shadow. Set the blending mode to Multiply and go to Filter>Blur>Gaussian blur, amount 20px. You can also reduce the layer’s opacity to adjust the shadow.

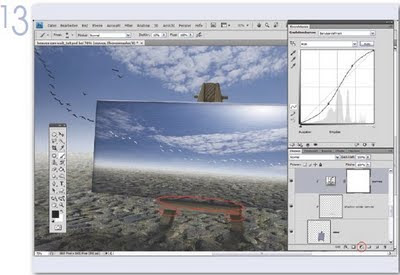
Easel’s fine-tuning
Create a new Curves Adjustment Layer by clicking the marked symbol to adjust the contrast of the easel. Use [Strg]+[Alt]+[g] to get a Clipping Mask. The easel also needs shadows. As in step 11, you create a new layer as a Clipping Mask and paint the shadows with a small brush with 15% opacity. Finally set the blending mode to Multiply.
Texture
Now it is time for the texture. Open the file and drag-and-drop it with the Move Tool [v] into your image. Transform it with [Strg]+[t] and set the blending mode to soft light.
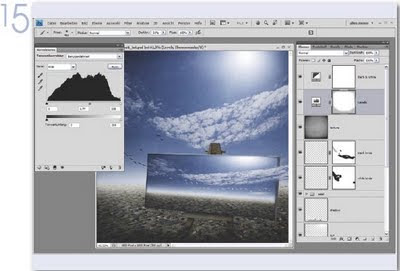
More impact
To give the image more contrast add a new Levels Adjustment Layer (as in step 16) and adjust the midtones (see figure). Because of the texture, the edges are too dark now. You can correct it by painting in the layer mask as you see in the figure. Another way to get more contrast is to create a Black and White layer in the Soft Light blending mode, with 50% opacity.
The End
The last Adjustment Layer will add the Hue. Choose Solid Color (db8a17), set the blending mode to Soft Light and reduce the opacity. Finally, use [Strg]+[Shift]+[Alt]+[e] to copy the layers once again and go to Filter>Sharpen>Unsharp Mask with the settings 50 – 20 – 0. Set the opacity to 50% and reduce the sharpness of the ground by painting in the mask. That is it! I hope you enjoyed this tutorial.


Dynamic
To get a more dynamic sky you have to distort the clouds (edit>transform>distort). You will see a frame with eight markers around the layer. To distort the image you can drag the corner markers and stretch them. To apply the transformation, hit Enter.

Perspective
In the same way you add perspective to the ground (edit>transform>perspective), activate the ground-layer and drag the corner markers to correct the perspective (see figure). This will momentarily render the image very muddy, but after applying the transformation it will become clear.

More depth
The next step is to create a layer for the haze. Click on the new layer button in the layers palette and rename it. Take a white brush with 0% hardness and an opacity <10% and paint along the horizon.

Let the sun shine
Create a new layer for the sun, using a white brush with 200px and 100% opacity. Your first click will be the center of the sun. Now, hold the position of your brush and change the brush's diameter and opacity by pressing the number keys and [#]. You will always need one click, then followed by one of the settings:
• 600px – 80%
• 1000px – 60%
• 1500px – 40%
• 2500px – 10%
Add the easel+Prepare the Canvas
Open the file easel.png and add it to your image using the Move Tool [v]. For the next step, you have to hide this layer temporarily by clicking on the eye-icon. Make sure that your sun-layer is activated and first go to Select>All, then Edit>Copy Merged and finally Edit>Paste. You can also use the shortcut [Strg]+[Shift]+[Alt]+[e] to copy the visible layers. Name this new layer canvas and set it on the top of the layer's palette.

Build the Canvas
Now it is time to unhide the easel and transform the canvas with Edit>Free transform. You also can use [Strg]+[t] and drop down the menu by clicking the right mouse button to add perspective to the canvas.

Frame
To build the canvas’s frame duplicate the easellayer and move [v] the duplicated layer to the right edge of the canvas (see figure). Create a black layer mask by holding down the [Alt]-key while clicking on the Add Layer Mask icon. All pixels in this layer are hidden now. Using a white brush, you can paint the parts you want to keep in your image. Make sure that the layer mask is activated. In the same way you can build the frame on the top of the canvas.

Canvas-look+Connection
To get a typical canvas-look, go to Filter>Texture>Texturizer and choose Canvas, Scaling 91 and Relief 1. Create a Clipping Mask above the canvas (layer>new, activiate clipping mask) and use the Brush Tool to paint a shadow around it. Use a dark gray brush with a 40% opacity. In this step you will build a connection between the two images and let the clouds fly off the canvas. Duplicate the canvas-layer, and put it on the top of the layers palette. Then, move the clouds towards their correct position (reduce opacity for a better view). As in step 10, you create a black layer mask and use a brush to paint the clouds into your image.

Extract the birds
Now, open the file birds.jpg and add it to your image. You can get a transparent background by choosing blending options (double click in the layer). Slide the white triangle to the left until the sky in the image is completely gone. Split the sliders by holding the [Alt]-key to make a more accurate attempt and then click OK. To use this layer for the next step you have to create a new layer below the birds and choose Merge down.

Let them fly
With [Strg]+[t] you can transform the birds like you see it in the figure. To get the white birds, you have to duplicate and invert [Strg]+[i] this layer. Create white layer masks for both bird-layers by clicking on the Add Layer Mask icon. By using a black brush you can hide the parts you do not need.

Shadow
To get a more realistic look, add a shadow on the ground. Create a new layer below the easel-layer and use a dark gray brush with 0% hardness and 60% opacity to paint the shadow. Set the blending mode to Multiply and go to Filter>Blur>Gaussian blur, amount 20px. You can also reduce the layer’s opacity to adjust the shadow.

Easel’s fine-tuning
Create a new Curves Adjustment Layer by clicking the marked symbol to adjust the contrast of the easel. Use [Strg]+[Alt]+[g] to get a Clipping Mask. The easel also needs shadows. As in step 11, you create a new layer as a Clipping Mask and paint the shadows with a small brush with 15% opacity. Finally set the blending mode to Multiply.

Texture
Now it is time for the texture. Open the file and drag-and-drop it with the Move Tool [v] into your image. Transform it with [Strg]+[t] and set the blending mode to soft light.

More impact
To give the image more contrast add a new Levels Adjustment Layer (as in step 16) and adjust the midtones (see figure). Because of the texture, the edges are too dark now. You can correct it by painting in the layer mask as you see in the figure. Another way to get more contrast is to create a Black and White layer in the Soft Light blending mode, with 50% opacity.

The End
The last Adjustment Layer will add the Hue. Choose Solid Color (db8a17), set the blending mode to Soft Light and reduce the opacity. Finally, use [Strg]+[Shift]+[Alt]+[e] to copy the layers once again and go to Filter>Sharpen>Unsharp Mask with the settings 50 – 20 – 0. Set the opacity to 50% and reduce the sharpness of the ground by painting in the mask. That is it! I hope you enjoyed this tutorial.

+android+porn+app+sex+%5B4%5D.png)


0 komentar:
Posting Komentar