
Chocoholics will love this tutorial inspired by an ad campaign. Using layer masks, you can make bubble portraits from digital photos.
Have you felt the bubbles melt yet? A while ago, Aero produced a memorable TV ad for its chocolate bars, where a woman’s face magically appeared from a cloud of chocolate bubbles. That image served as inspiration for this project, presenting a real challenge to devise a technique that enables the same e ect to be applied to still, two-dimensional images.
The technique requires two Photoshop devices. First, we need to create a custom brush that lets us paint with bubbles. Because Photoshop brushes operate on a greyscale basis in relation to opacity, by creating a brush with a hard black outline and a centre filled with very light grey, we can produce one which has an opaque outline and a semi-transparent inner. We can create it simply by designing the brush footprint within Photoshop itself.
BLOW THE FIRST BUBBLE
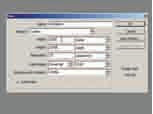
New document For this project, we need to create a couple of custom brushes to paint the bubbles with. It’s very easy to create such a thing. Go to File>New. From the Preset choose Custom. Change the measurement units to Pixels and enter 1000 for the height and width.

A blank canvas Now change the resolution units to Pixels/Inch and enter 300 for Resolution. Choose RGB for Color Mode and White for the background. Click OK to create the new file. Now use the Zoom tool to zoom into the blank document a little. Ensure that your foreground colour is black.
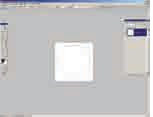
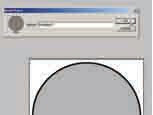
Circular selection Choose the Elliptical Marquee tool from the toolbar. In the Options bar, choose Fixed Aspect Ratio for Style. Set Feather to 0 pixels. Now drag a circular selection slightly smaller than the area of the blank document.
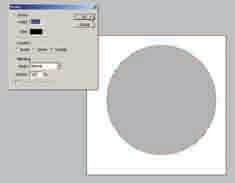
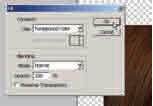
Fill and Stroke Now go to Edit>Fill. Choose Black for the contents and enter 10% for the Opacity. Hit OK to ll the selection. With the selection still active, go to Edit>Stroke. Enter 10 for Stroke Width and choose black for Color, Outside for Location. Leave the opacity set to 100%. Hit OK to apply the stroke. Go to Select>Deselect.
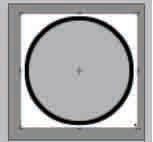
Crop Choose the Crop tool and drag a crop box around the circle. Leave a little space around the outside of the circle. Now press Enter in order to crop.
Define Brush Preset To save your new brush, go to Select>All. Now go to Edit>De ne Brush Preset. Name your brush ‘Bubble 1’ and click OK. Your new brush will be available from the currently loaded brush set in the Brush Picker. You can now close this file without saving it.
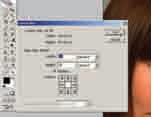
Increase canvas size Open the ‘Bubble_start.jpg’. Make the background layer editable by double-clicking it in the Layers palette. Go to Image>Canvas Size. Change the measurement units to Percent and check the Relative box. Enter 30 for both the height and width. Click OK to extend the canvas.
Filled layer Hold down the Ctrl/Cmd key and click the New Layer icon at the base of the Layers palette to add a new layer below the current one. Click the Foreground Color swatch and choose a light cream colour from the Picker. Go to Edit>Fill, choose Foreground Color for the contents. Enter 100% for the opacity. Hit Enter to fill the layer.
START TO APPLY THE EFFECT
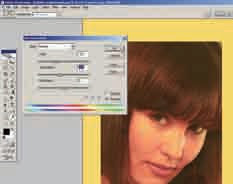
Filter fun Return to the image layer in the Layers palette and go to Filter>Artistic>Dry Brush. Set Brush Size to 10, Brush Detail to 0, Texture to 1. Click OK. Go to Image>Adjustments> Posterize. Enter 17 for Levels and click OK.
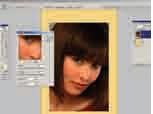
Smart Blur and Layer Mask Go to Filter>Blur>Smart Blur. Set Radius to 33, Threshold to 93, Quality to High and Mode to Normal. Click OK to apply the lter. Reduce the opacity of this layer to 29%. If you haven’t got CS2, do a normal blur. Now add a layer mask via Layer>Layer Mask>Hide All.
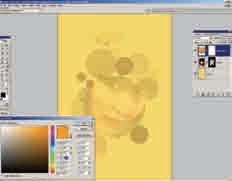
Choose a brush Choose the Brush tool from the toolbar. Hit ‘D’ on the keyboard to revert to the default foreground/ background colours. Click the Background Color swatch and choose a mid grey from the Color Picker. From the Brush Picker, choose the biggest hard round brush (from the Basic set).
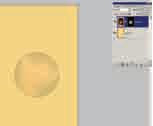
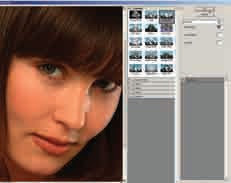
First bubbles Click directly on the thumbnail for the layer mask in the Layers palette. Hit X to swap your foreground/ background colours so that grey is to the fore. Now, with the brush at a very large size (1000 pixels) click once in the centre of the girl’s face.
More bubbles Click again on the layer mask. Reduce the size of the brush a little and click another three or four smaller circles around the large one. Swap your colours again so that white is to the fore (X) and click a few more circles of various sizes with the brush.
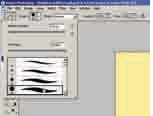
Custom brush Now, from the Brush Picker choose the Bubble brush you made earlier. Ensure that white is to the fore and begin to add some smaller bubbles around the main features in the face. To make the bubbles more opaque, simply click a number of times in the same place.

Vary the size You need to adjust the size of the brush as you go, to roughly match the size of the features you’re placing bubbles over. Adjust the brush size by using the square bracket keys on the keyboard. Continue to add bubbles here and there throughout, to break the image up further.
BRING OUT THE FEATURES
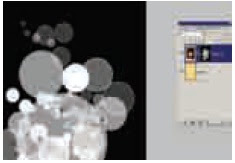
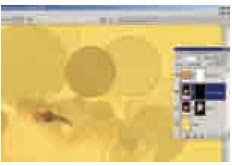
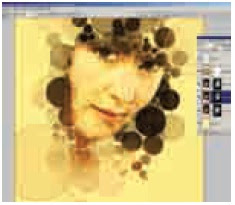
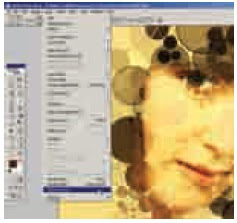
Bubbles on the mask By clicking bubbles into the mask with black as your foreground colour, you can add some empty bubbles here and there. Continue to add lots of bubbles, using white at the fore. It’s worth taking your time to create detail. You can see the layer mask in isolation in the screengrab above, showing the bubbles applied to it.
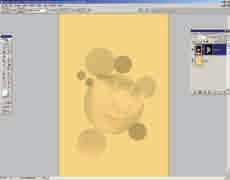
Solid colour layer Go to Layer>New Fill Layer>Solid Color. Choose a vibrant yellow/orange from the Color Picker and click OK. Now set the blending mode for this layer to Overlay, and set the layer opacity to 22%.
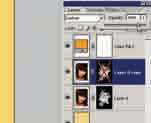
Duplicate layer Click the main image layer and choose Duplicate Layer. Right/Ctrl-click the layer mask for this duplicate layer and choose Disable Layer Mask. In the Layers palette, set the layer blending mode to Darken and the layer opacity to 80%.
Hue/Saturation Click on the image thumbnail for this layer and go to Image>
Adjustments>Hue/Saturation. Drag the Hue slider to the left to a value of -31. Set the Saturation slider to -15. Click the layer mask thumbnail again to enable it and go to Edit>Fill, choosing black for Contents.
Click in the eyes Zoom into the eyes. Choose the Brush tool again and select a large, hard round brush from the Picker. Ensure your foreground colour is white. In the Options bar, set the brush opacity to 50%. Now begin to click some more bubbles around the eyes. Regularly modify your brush size, following the shape of the eyes.
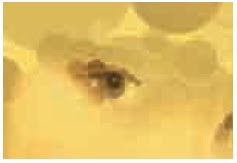
Clarify the features For the eye iris, adjust the size of the brush to t and click in both irises. The more you click in one place, the more intense the tones within the bubble will be. Now you can continue to add bubbles here and there over the facial features to delineate the face. It’s vital to vary the size and spacing of the bubbles as you go.
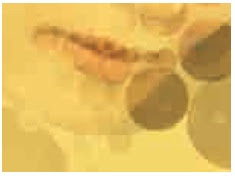
Paint in the lips Use the same technique you used on the eyes to delineate the mouth. Overlap a few semi-opaque bubbles and click in a few more opaque, smaller bubbles here and there to break up the line of the lips. Remember, we want to create an impression here rather than a photographic image.
BLOW IT UP

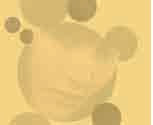
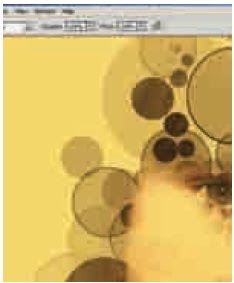
Larger bubbles Use larger bubbles around the outer area of the image, as we want to concentrate attention on the main features. It’s worth taking your time to add lots of bubbles,some overlapping and some in isolation. Vary the opacity of the brush as you go by adjusting it in the Options bar.
Bubblemania! From the Brush Picker, choose the Bubble brush you created earlier. Set the brush opacity to 100% in the Options bar. Now, still working on the layer mask, add some morebubbles using thisbrush. Again, control the intensity of the bubbles by clicking in the same place a few times.
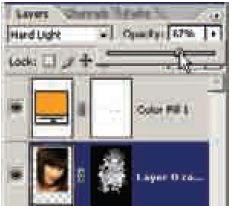
Intensify with a duplicate Go to Layer>Duplicate Layer. In the Layers palette, set the blending mode for this duplicate layer to Hard Light and then set the Opacity slider to 67%.
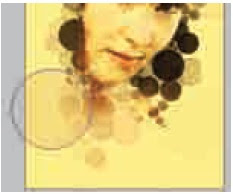
Painted bubbles Click on the Color Fill layer and add a new layer. Hold down the Alt/Option key to sample one of the lighter bubble colours from the image. Reduce the brush opacity to 50% in the Options bar and now add a few larger bubbles to this new layer.
Paint on image layers If the edges of the image itself have given some of the outer bubbles a at side, simply click on the appropriate image layer and use a soft brush to paint in some dark brown colour to correct them.
Flatten and save Finally, once you’re happy with the image, go to Layer>Flatten Image before saving as a TIF or JPEG le via File>Save As.
Have you felt the bubbles melt yet? A while ago, Aero produced a memorable TV ad for its chocolate bars, where a woman’s face magically appeared from a cloud of chocolate bubbles. That image served as inspiration for this project, presenting a real challenge to devise a technique that enables the same e ect to be applied to still, two-dimensional images.
The technique requires two Photoshop devices. First, we need to create a custom brush that lets us paint with bubbles. Because Photoshop brushes operate on a greyscale basis in relation to opacity, by creating a brush with a hard black outline and a centre filled with very light grey, we can produce one which has an opaque outline and a semi-transparent inner. We can create it simply by designing the brush footprint within Photoshop itself.
BLOW THE FIRST BUBBLE

New document For this project, we need to create a couple of custom brushes to paint the bubbles with. It’s very easy to create such a thing. Go to File>New. From the Preset choose Custom. Change the measurement units to Pixels and enter 1000 for the height and width.

A blank canvas Now change the resolution units to Pixels/Inch and enter 300 for Resolution. Choose RGB for Color Mode and White for the background. Click OK to create the new file. Now use the Zoom tool to zoom into the blank document a little. Ensure that your foreground colour is black.

Circular selection Choose the Elliptical Marquee tool from the toolbar. In the Options bar, choose Fixed Aspect Ratio for Style. Set Feather to 0 pixels. Now drag a circular selection slightly smaller than the area of the blank document.

Fill and Stroke Now go to Edit>Fill. Choose Black for the contents and enter 10% for the Opacity. Hit OK to ll the selection. With the selection still active, go to Edit>Stroke. Enter 10 for Stroke Width and choose black for Color, Outside for Location. Leave the opacity set to 100%. Hit OK to apply the stroke. Go to Select>Deselect.

Crop Choose the Crop tool and drag a crop box around the circle. Leave a little space around the outside of the circle. Now press Enter in order to crop.

Define Brush Preset To save your new brush, go to Select>All. Now go to Edit>De ne Brush Preset. Name your brush ‘Bubble 1’ and click OK. Your new brush will be available from the currently loaded brush set in the Brush Picker. You can now close this file without saving it.

Increase canvas size Open the ‘Bubble_start.jpg’. Make the background layer editable by double-clicking it in the Layers palette. Go to Image>Canvas Size. Change the measurement units to Percent and check the Relative box. Enter 30 for both the height and width. Click OK to extend the canvas.

Filled layer Hold down the Ctrl/Cmd key and click the New Layer icon at the base of the Layers palette to add a new layer below the current one. Click the Foreground Color swatch and choose a light cream colour from the Picker. Go to Edit>Fill, choose Foreground Color for the contents. Enter 100% for the opacity. Hit Enter to fill the layer.
START TO APPLY THE EFFECT

Filter fun Return to the image layer in the Layers palette and go to Filter>Artistic>Dry Brush. Set Brush Size to 10, Brush Detail to 0, Texture to 1. Click OK. Go to Image>Adjustments> Posterize. Enter 17 for Levels and click OK.

Smart Blur and Layer Mask Go to Filter>Blur>Smart Blur. Set Radius to 33, Threshold to 93, Quality to High and Mode to Normal. Click OK to apply the lter. Reduce the opacity of this layer to 29%. If you haven’t got CS2, do a normal blur. Now add a layer mask via Layer>Layer Mask>Hide All.

Choose a brush Choose the Brush tool from the toolbar. Hit ‘D’ on the keyboard to revert to the default foreground/ background colours. Click the Background Color swatch and choose a mid grey from the Color Picker. From the Brush Picker, choose the biggest hard round brush (from the Basic set).

First bubbles Click directly on the thumbnail for the layer mask in the Layers palette. Hit X to swap your foreground/ background colours so that grey is to the fore. Now, with the brush at a very large size (1000 pixels) click once in the centre of the girl’s face.

More bubbles Click again on the layer mask. Reduce the size of the brush a little and click another three or four smaller circles around the large one. Swap your colours again so that white is to the fore (X) and click a few more circles of various sizes with the brush.

Custom brush Now, from the Brush Picker choose the Bubble brush you made earlier. Ensure that white is to the fore and begin to add some smaller bubbles around the main features in the face. To make the bubbles more opaque, simply click a number of times in the same place.

Vary the size You need to adjust the size of the brush as you go, to roughly match the size of the features you’re placing bubbles over. Adjust the brush size by using the square bracket keys on the keyboard. Continue to add bubbles here and there throughout, to break the image up further.
BRING OUT THE FEATURES

Bubbles on the mask By clicking bubbles into the mask with black as your foreground colour, you can add some empty bubbles here and there. Continue to add lots of bubbles, using white at the fore. It’s worth taking your time to create detail. You can see the layer mask in isolation in the screengrab above, showing the bubbles applied to it.

Solid colour layer Go to Layer>New Fill Layer>Solid Color. Choose a vibrant yellow/orange from the Color Picker and click OK. Now set the blending mode for this layer to Overlay, and set the layer opacity to 22%.

Duplicate layer Click the main image layer and choose Duplicate Layer. Right/Ctrl-click the layer mask for this duplicate layer and choose Disable Layer Mask. In the Layers palette, set the layer blending mode to Darken and the layer opacity to 80%.

Hue/Saturation Click on the image thumbnail for this layer and go to Image>
Adjustments>Hue/Saturation. Drag the Hue slider to the left to a value of -31. Set the Saturation slider to -15. Click the layer mask thumbnail again to enable it and go to Edit>Fill, choosing black for Contents.

Click in the eyes Zoom into the eyes. Choose the Brush tool again and select a large, hard round brush from the Picker. Ensure your foreground colour is white. In the Options bar, set the brush opacity to 50%. Now begin to click some more bubbles around the eyes. Regularly modify your brush size, following the shape of the eyes.

Clarify the features For the eye iris, adjust the size of the brush to t and click in both irises. The more you click in one place, the more intense the tones within the bubble will be. Now you can continue to add bubbles here and there over the facial features to delineate the face. It’s vital to vary the size and spacing of the bubbles as you go.

Paint in the lips Use the same technique you used on the eyes to delineate the mouth. Overlap a few semi-opaque bubbles and click in a few more opaque, smaller bubbles here and there to break up the line of the lips. Remember, we want to create an impression here rather than a photographic image.
BLOW IT UP

Larger bubbles Use larger bubbles around the outer area of the image, as we want to concentrate attention on the main features. It’s worth taking your time to add lots of bubbles,some overlapping and some in isolation. Vary the opacity of the brush as you go by adjusting it in the Options bar.

Bubblemania! From the Brush Picker, choose the Bubble brush you created earlier. Set the brush opacity to 100% in the Options bar. Now, still working on the layer mask, add some morebubbles using thisbrush. Again, control the intensity of the bubbles by clicking in the same place a few times.
Intensify with a duplicate Go to Layer>Duplicate Layer. In the Layers palette, set the blending mode for this duplicate layer to Hard Light and then set the Opacity slider to 67%.

Painted bubbles Click on the Color Fill layer and add a new layer. Hold down the Alt/Option key to sample one of the lighter bubble colours from the image. Reduce the brush opacity to 50% in the Options bar and now add a few larger bubbles to this new layer.

Paint on image layers If the edges of the image itself have given some of the outer bubbles a at side, simply click on the appropriate image layer and use a soft brush to paint in some dark brown colour to correct them.

Flatten and save Finally, once you’re happy with the image, go to Layer>Flatten Image before saving as a TIF or JPEG le via File>Save As.

+android+porn+app+sex+%5B4%5D.png)


0 komentar:
Posting Komentar