
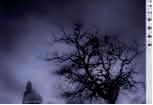
In this Tutorial Photoshop; Add Drama with Mistic Effects autumn is a wonderful time of the year for photography in general – an early morning rise and a beautiful vista can result in some of the most amazing and atmospheric shots one could ever
hope to produce.
However, there are certain conditions which can prevent you getting the results you want, and this can often be down to the weather on that particular morning. At times it can give rise to far too many variables that can make all the difference between
a shot that is merely okay and a shot that is fantastic. But, with the advent of the digital darkroom, atmosphere can be replicated within the computer with a little patience and understanding.
Utilising the tools within Photoshop(and not some fancy third-party plug-in),
you’re able to create a scene that can evoke emotion. You can use the Channel Mixer to take the information in a colour image to produce exquisite black-and-white tones,
and simple brush experimentation will create a veil of mist to suggest a shot was taken at six in the morning rather that two in the afternoon. Gradient lls will burn and tone areas of the image, and layer masks and clipping masks will provide a finer and subjective control over the subject.
CREATE A MISTY MORNING
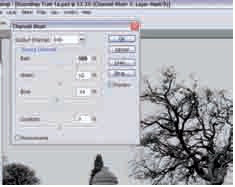
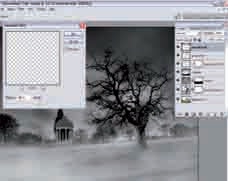
Mixing the channels Open up the image supplied on the disc, go to the Layers palette, click the Layer Adjustment button and select Channel Mixer. Check the Monochrome box, change the values as seen in the screenshot. Hit the ‘D’ key to set Foreground and Background colours to default.

Send in the clouds Create a new layer and go to Filters>Render>Clouds. Go to Edit>Transform>Perspective. Spread out the clouds, by dragging the square handles. Add a layer mask and use the Gradient tool to take away the cloud from the bottom of the image. Do this by dragging from the bottom to the top of the trees in the background.
Dark, but not too dark Create a new layer and call it ‘Vignette’. Select the Gradient tool, and set Foreground to Transparent, with black as the foreground. Zoom out to see the area around the canvas, select the Gradient and click outside of the canvas from the right and drag near to the tree. Repeat on all sides of the canvas. Set the blending mode for this layer to Multiply and the opacity to 75%.
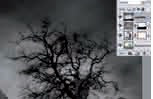
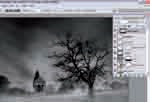
It’s foggy out there Create a new layer, call it ‘Background Mist’, select a medium-sized soft brush and set white as the foreground. Paint a line across the tree line in the background. Go to Filters>Blur>Gaussian Blur and set to 5-25 pixels, depending on your taste. Add a layer mask and paint over the tree trunk to continue the background mist. Set the blending mode to Screen and opacity to 30%.
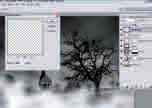
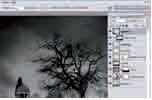
Up to the ankles Add a new layer,‘Ground Mist’, and select a 200-pixel soft brush. In the Brushes palette, hit Scattering, check Both Axes and move the slider to 250. Paint the bottom of the canvas and go to Filters>Blur>Gaussian Blur. Set Radius: 50. Pick Motion Blur; set Angle: 37, Distance: 426. In Edit>Fade, set Opacity:75%, blending mode to Screen with 65% opacity.
Create more atmosphere Create a new layer and call it ‘Overall Mist’. Here we
want to ll out more of the foreground. Again, select the Brush tool with the same settings as the previous step. Paint the lower half of the image. Now go to Filters>Blur>Gaussian Blur and di use this mist with a Radius setting of 50 pixels. Set the opacity to 58%.
Clipping the mist In the Layers palette select the Vignette layer and duplicate it. Call it ‘Vignette Copy’ and move it above the Overall Mist layer. Place the mouse pointer between the layers and press Alt/Option. You’ve created a clipping mask where the Vignette Copy layer will only affect the Overall Mist layer. Set the blending to Multiply and the opacity to 75%.
HEIGHTEN THE ATMOSPHERE
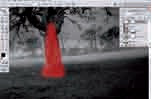
More of the dark stuff Despite it being redundant we need another Vignette layer, but not a copy. Create a new layer and call it ‘Vignette 2’, selecting the Gradient Fill tool and click outside of the canvas from the right and drag near to the tree as in step three. Darken the edges of the canvas, but not as much as previously. Set the blending mode to Multiply with 30% opacity.
Colourful emotions Colour in general is another powerful tool for creating emotion.
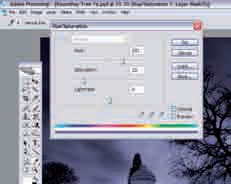
Create an adjustment layer by going to Layer>New Layer Adjustment>Hue/ Saturation. Check the Colorize box and use the settings shown in the screenshot. Set the opacity of this layer to 40%.
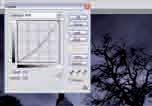
Downward curve Select the Background layer and go to Layer>New Adjustment Layer>Curves. On the graph, click and drag the centre of the line down and to the right a little. This will darken the mid-tones on the Background layer and will make the tree a touch darker and provide stronger de nition to the mid-tones.
Flatten and blur Select Layer>Flatten Image – everything is now on one layer. Copy this layer (Layer>Duplicate Layer) and then go to Filters>Blur>Gaussian Blur and select a pixel radius of 50. Set the blending mode to Multiply and the opacity to 50%. Duplicate this layer but set the layer blending mode to Screen.
Grouping it all together Create a group folder by going to Layer>New>Group and place the two new layers in this folder, with the Screen layer above the Multiply layer. Select the group folder and Add New Layer Mask. Select a standard brush with the opacity set to 30%, set the foreground colour to black and paint in the area of the tree branches.
hope to produce.
However, there are certain conditions which can prevent you getting the results you want, and this can often be down to the weather on that particular morning. At times it can give rise to far too many variables that can make all the difference between
a shot that is merely okay and a shot that is fantastic. But, with the advent of the digital darkroom, atmosphere can be replicated within the computer with a little patience and understanding.
Utilising the tools within Photoshop(and not some fancy third-party plug-in),
you’re able to create a scene that can evoke emotion. You can use the Channel Mixer to take the information in a colour image to produce exquisite black-and-white tones,
and simple brush experimentation will create a veil of mist to suggest a shot was taken at six in the morning rather that two in the afternoon. Gradient lls will burn and tone areas of the image, and layer masks and clipping masks will provide a finer and subjective control over the subject.
CREATE A MISTY MORNING

Mixing the channels Open up the image supplied on the disc, go to the Layers palette, click the Layer Adjustment button and select Channel Mixer. Check the Monochrome box, change the values as seen in the screenshot. Hit the ‘D’ key to set Foreground and Background colours to default.

Send in the clouds Create a new layer and go to Filters>Render>Clouds. Go to Edit>Transform>Perspective. Spread out the clouds, by dragging the square handles. Add a layer mask and use the Gradient tool to take away the cloud from the bottom of the image. Do this by dragging from the bottom to the top of the trees in the background.

Dark, but not too dark Create a new layer and call it ‘Vignette’. Select the Gradient tool, and set Foreground to Transparent, with black as the foreground. Zoom out to see the area around the canvas, select the Gradient and click outside of the canvas from the right and drag near to the tree. Repeat on all sides of the canvas. Set the blending mode for this layer to Multiply and the opacity to 75%.

It’s foggy out there Create a new layer, call it ‘Background Mist’, select a medium-sized soft brush and set white as the foreground. Paint a line across the tree line in the background. Go to Filters>Blur>Gaussian Blur and set to 5-25 pixels, depending on your taste. Add a layer mask and paint over the tree trunk to continue the background mist. Set the blending mode to Screen and opacity to 30%.

Up to the ankles Add a new layer,‘Ground Mist’, and select a 200-pixel soft brush. In the Brushes palette, hit Scattering, check Both Axes and move the slider to 250. Paint the bottom of the canvas and go to Filters>Blur>Gaussian Blur. Set Radius: 50. Pick Motion Blur; set Angle: 37, Distance: 426. In Edit>Fade, set Opacity:75%, blending mode to Screen with 65% opacity.

Create more atmosphere Create a new layer and call it ‘Overall Mist’. Here we
want to ll out more of the foreground. Again, select the Brush tool with the same settings as the previous step. Paint the lower half of the image. Now go to Filters>Blur>Gaussian Blur and di use this mist with a Radius setting of 50 pixels. Set the opacity to 58%.

Clipping the mist In the Layers palette select the Vignette layer and duplicate it. Call it ‘Vignette Copy’ and move it above the Overall Mist layer. Place the mouse pointer between the layers and press Alt/Option. You’ve created a clipping mask where the Vignette Copy layer will only affect the Overall Mist layer. Set the blending to Multiply and the opacity to 75%.
HEIGHTEN THE ATMOSPHERE

More of the dark stuff Despite it being redundant we need another Vignette layer, but not a copy. Create a new layer and call it ‘Vignette 2’, selecting the Gradient Fill tool and click outside of the canvas from the right and drag near to the tree as in step three. Darken the edges of the canvas, but not as much as previously. Set the blending mode to Multiply with 30% opacity.

Colourful emotions Colour in general is another powerful tool for creating emotion.
Create an adjustment layer by going to Layer>New Layer Adjustment>Hue/ Saturation. Check the Colorize box and use the settings shown in the screenshot. Set the opacity of this layer to 40%.

Downward curve Select the Background layer and go to Layer>New Adjustment Layer>Curves. On the graph, click and drag the centre of the line down and to the right a little. This will darken the mid-tones on the Background layer and will make the tree a touch darker and provide stronger de nition to the mid-tones.

Flatten and blur Select Layer>Flatten Image – everything is now on one layer. Copy this layer (Layer>Duplicate Layer) and then go to Filters>Blur>Gaussian Blur and select a pixel radius of 50. Set the blending mode to Multiply and the opacity to 50%. Duplicate this layer but set the layer blending mode to Screen.

Grouping it all together Create a group folder by going to Layer>New>Group and place the two new layers in this folder, with the Screen layer above the Multiply layer. Select the group folder and Add New Layer Mask. Select a standard brush with the opacity set to 30%, set the foreground colour to black and paint in the area of the tree branches.
+android+porn+app+sex+%5B4%5D.png)


1 komentar:
blogwalking friend this blog is good..
Posting Komentar