
From this tutorial you will learn how to restore an old photo and take care of the faded areas as well as color balance.
Step 1
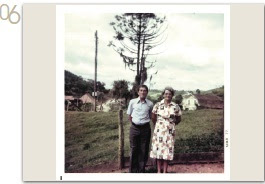
With the original photo in hand we can see that it is faded and color aged, with minor problems with risks and scratches. Here we have a photo from 1977, taken in south of Brazil.

Step 2
Now, for questions of fidelity we are going to keep the original photo and start adjusting the faded photo. You can use the Fade Correction
Adjust at will, but keep in mind that in some cases it will dark the image. Therefore, we use here a level of 45 to get the faded colors better. Adjust>color>fade correction>amount 45.

Step 3
Than, we can use an effect that will sharp a lithe and improve brightness of the image. Take care to use it; a higher amount of this effect will get the
photo too sharp. I used an amount of five in this case, it gets a good effect and do not affect the original aspect of the photo. Adjust>Brightness and Contrast>Clarify>amount 5.

Step 4
A little bit of Contrast and Brightness. A value of 10 of each will be good enough. Adjust>Brightness and Contrast>Brightness/Contrast>amount of brightness 10 / amount of contrast 10.

Step 5
Lets remove some minor specks of the image with the Salt and Pepper filter. In many cases a low value will be good enough. Adjust>Add/Remove Noise>Salt and Pepper Filter…>Speck size (pixels) 10/Sensitivity to specks 2.

Step 6
We are almost finished here; we can adjust the color to be a little bit warmer using the color balance option. I used here a preset adjust. Adjust>Color
Balance…>Settings>Fluorescent – Cool (4300K) So here, it is, you do not have to change many physical aspects of the image using tools like the clone tool, we used just some filters and that is the result. Keep in mind that the restoration of old photos needs to change just a few things to keep it as an original photo, not a photoshoped one.
Step 1
With the original photo in hand we can see that it is faded and color aged, with minor problems with risks and scratches. Here we have a photo from 1977, taken in south of Brazil.

Step 2
Now, for questions of fidelity we are going to keep the original photo and start adjusting the faded photo. You can use the Fade Correction
Adjust at will, but keep in mind that in some cases it will dark the image. Therefore, we use here a level of 45 to get the faded colors better. Adjust>color>fade correction>amount 45.

Step 3
Than, we can use an effect that will sharp a lithe and improve brightness of the image. Take care to use it; a higher amount of this effect will get the
photo too sharp. I used an amount of five in this case, it gets a good effect and do not affect the original aspect of the photo. Adjust>Brightness and Contrast>Clarify>amount 5.

Step 4
A little bit of Contrast and Brightness. A value of 10 of each will be good enough. Adjust>Brightness and Contrast>Brightness/Contrast>amount of brightness 10 / amount of contrast 10.

Step 5
Lets remove some minor specks of the image with the Salt and Pepper filter. In many cases a low value will be good enough. Adjust>Add/Remove Noise>Salt and Pepper Filter…>Speck size (pixels) 10/Sensitivity to specks 2.

Step 6
We are almost finished here; we can adjust the color to be a little bit warmer using the color balance option. I used here a preset adjust. Adjust>Color
Balance…>Settings>Fluorescent – Cool (4300K) So here, it is, you do not have to change many physical aspects of the image using tools like the clone tool, we used just some filters and that is the result. Keep in mind that the restoration of old photos needs to change just a few things to keep it as an original photo, not a photoshoped one.

+android+porn+app+sex+%5B4%5D.png)


0 komentar:
Posting Komentar