
Windows 7 is Microsoft’s most impressive desktop operating system to date, but in today’s world, few users actually access a single PC. In addition, you use online services, have portable devices such as smart phones and portable media players, and manage home networks with two or more PCs, some of which are laptops and other mobile computers. Throughout this book, we’ve tried to maintain this sense of perspective, because Windows 7 doesn’t exist in a vacuum. Instead, it’s part of a complex and growing electronic ecosystem of products and services. That’s why we also cover Zune, Windows Mobile, and Microsoft’s Live services in this book. They’re all interrelated. But if you’re looking for one product that can really simplify the management of a multi- PC home, Windows Home Server has no peers. Don’t let the name scare you: though this product is indeed based on Microsoft’s enterprise-class servers, Windows Home Server is designed for home users, and it is surprisingly easy to use, given its vast capabilities. In this chapter, we’ll examine Windows Home Server, Microsoft’s solution for the multi- PC home.
In late 2007, Microsoft’s PC maker and hardware partners began shipping specially designed home server products based around a new operating system called Windows Home Server. Code-named “Q” (and previously code-named “Quattro”), Windows Home Server is just what its name suggests, a home server product. It provides a central place to store and share documents, along with other useful services for the connected home.
Truth be told, Windows power users don’t have to buy a prebuilt home server to get Windows Home Server, though we’ve both had excellent results doing so ourselves. Instead, if you’d like to purchase just the Windows Home Server software and install it on your own PC-based server, you can do so. Just visit an online electronics retailer such as Newegg.com and search for Windows Home Server. The software typically costs less than $100 in the United States.
Windows Home Server Evolution
In addition to Microsoft’s work on Windows Home Server, some key hardware partners have been working over the years to steadily improve their Windows Home Server machines with innovative hardware designs and interesting software solutions that extend core functionality through high-quality add-ins. Key among these is HP, whose MediaSmart Server line has proven to be the customer favorite in the United States, and for good reason: these machines consistently provide an even better experience than the stock Windows Home Server experience documented here. And yes, both Paul and Rafael rely on HP MediaSmart Servers in their own homes. These are excellent servers.
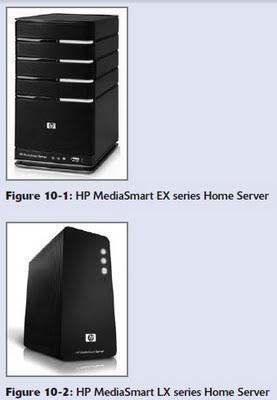
HP currently markets two different MediaSmart families of servers. The high-end MediaSmart EX series is the mainstream Home Server and supports multiple internal hard drives. It’s shown in Figure 10-1. The HP MediaSmart Server LX series, meanwhile, is a one-hard-drive option that is aimed at the low end of the market. Shown in Figure 10-2, these servers can be expanded externally.
Windows Home Server Installation and Configuration
Depending on how you acquire Windows Home Server, your one-time install and initial configuration experience will either be long and reasonably difficult or long and reasonably easy. Those who purchase new home server hardware will have the simpler—and likely superior—experience, but configuring the server is a time-consuming proposition in either case. That said, it’s a one-time deal. For the most part, you’ll install the server just once and then access it remotely occasionally after that.
Some PC makers, notably HP, have gone to great lengths to make the Windows Home Server initial setup experience much easier than the Microsoft default. See Paul’s reviews of HP’s MediaSmart Servers on the SuperSite for Windows www.winsupersite.com/server to see what we mean.
You may not be surprised to discover that you can bypass the Windows Home Server administrative console and access the bare-bones operating system if you know the trick. Here’s how it works: on a Windows 7–based PC, launch the Remote Desktop Connection utility (type remote in Start Menu Search), type the computer name (hostname) of your home server into the Computer field (typically something like HOME-SERVER), and supply the name administrator as the user name and the password for the master account that you configured during home server setup. Ta-da! You can now access the Windows Home Server Desktop, shown in Figure 10-3, just as you would any other computer. Note, however, that Windows Home Server is designed to be used remotely via the console, and not interactively, so be careful about installing software or making other changes via this remote desktop interface.
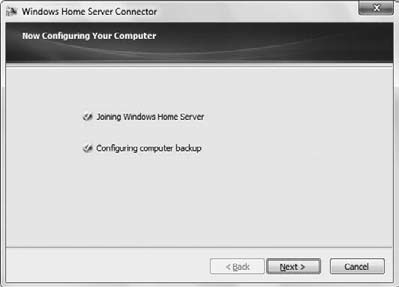
The initial configuration of Windows Home Server involves first installing the Windows Home Server Connector software, which comes on its own CD, on a client PC running Windows XP with Service Pack 2 or 3 or any version of Windows Vista or 7. (You can also access the Connector software via your home network; it can be found at \\{computer name}\Software\Home Server Connector Software\ by default.) The installer will “join,” or connect, your PC to the server (see Figure 10-4) for later backup purposes and then complete the setup process.
As is the case with any other PC-like network resource, you must log on to the Windows Home Server in order to access it remotely, and that’s true regardless of how you plan to access the server (via shared folders, the administrative console, or the Connector tray software). While it’s possible to maintain different logons on your PC and the server, it’s simpler to make them identical. That way, you will automatically and silently log on to the server every time you need to access it. In fact, Windows Home Server will prompt you to do this, as shown in Figure 10-5, if the passwords don’t match. Note, too, that if you configure Windows Home Server for remote access (detailed later in this chapter), the passwords you use need to meet minimum length and complexity guidelines, for your security

Admin Console Drive-By
You can launch the Windows Home Server Console from the Windows Home Server Connector icon in the taskbar notification area. (Remember that Windows 7 will hide this icon under “Show hidden icons” by default.) This icon is a colored square with a white home on it.
Companies that sell prebuilt Windows Home Server solutions, like HP, often include other tabs in this interface. These tabs expose functionality that is unique to those products.
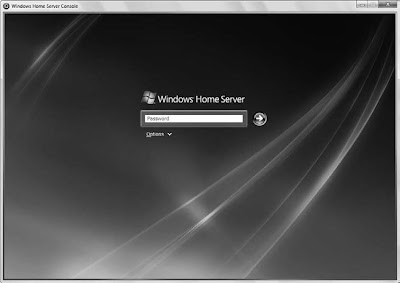
The Windows Home Server Console logon interface
The Windows Home Server Console presents a simple, multi-tabbed user interface.
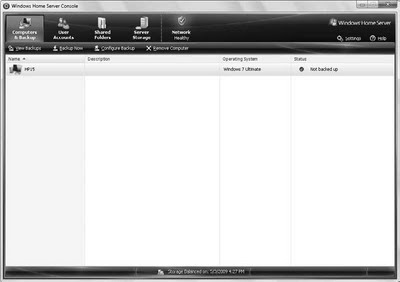
The following sections describe what’s available in every Windows Home Server Console user interface, regardless of how you obtained the server.
Computers & Backup
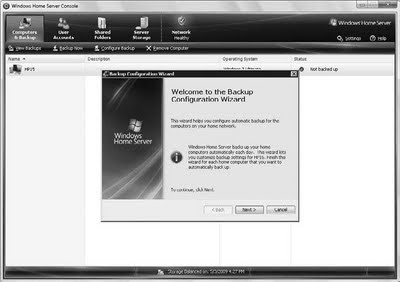
To configure backups on a PC-by-PC basis, navigate to the Computers & Backup interface in the Windows Home Server Console, right-click the PC you’d like to manage, and choose Configure Backup. The Backup Configuration Wizard shown in Figure 10-8 will appear, enabling you to choose which disks to back up and other details related to the process.
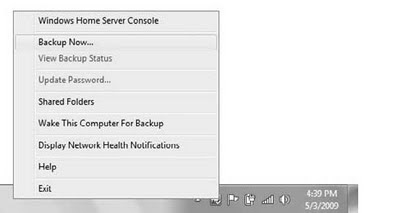
You can manually trigger a backup from the Connector tray icon on the client PC (as shown in Figure 10-9) or from within this interface. (Using the tray is much faster than waiting for the admin console to load, of course.) You can even trigger backups from other PCs if you’d like. Remember: Windows Home Server is all about central management of your PCs, so you’re free to trigger backups and other activities from any PC that has access to the Windows Home Server Console.
You can also trigger backups from the Windows Home Server Connector tray icon on your PC.
User Accounts
In the User Accounts tab, you can create user accounts that allow individuals to access various features of the server. By default, there is a guest account (disabled), but you will typically create accounts that map to accounts on the PCs you use, and thus to people in your home.
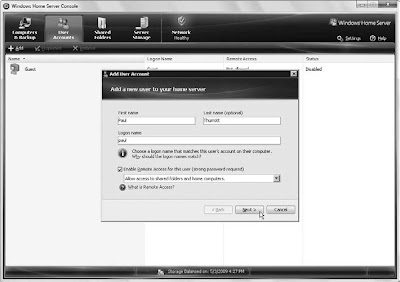
If you want to provide remote access, you need an even more complex password; and you can, of course, specify which users can access which shared folders (described in the next section). That way, your children, for example, could have access to certain shared folders but not others that you want to keep private.
Shared Folders
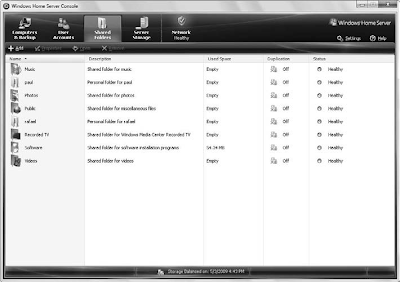
Here you’ll see all of the shared folders that are configured on the server, along with a simple Duplication option for each. This option specifies whether data in that folder is copied to two hard disks for reliability purposes. (Note that you must have at least two physical hard disk drives in the server to access this feature.) You can add and configure shares from here and determine access rights on a user-by-user basis.
Server Storage
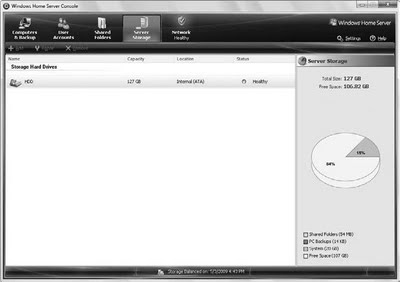
This section of the Windows Home Server user interface lists all of the hard drives currently attached to your server, whether or not they’re configured for use by the server, and other related information, as shown in Figure 10-12. You can add new storage to the server here or repair a hard drive that’s encountering errors. (When this happens, you’ll see a health alert in the Windows Home Server Connector tray icon on each connected PC.) You can also remove a hard drive using this interface if necessary.
Server Storage shows which drives are configured for use with the server and how storage is allocated.
Setting
The inconspicuous little Settings link in the upper-right corner of the Windows Home
Server Console opens the most complex UI you’ll see here, as shown in Figure 10-13—a Settings dialog with eight sections by default, though preinstalled versions of the server may have more.
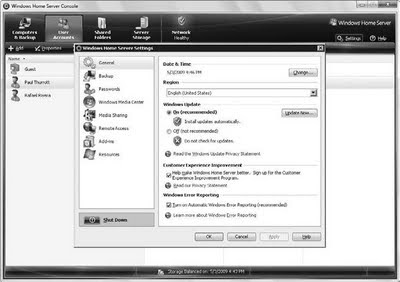
Default sections in the Settings dialog include the following:
- General: Configure date and time, region, Windows Update, and other basic settings.
- Backup: Configure various default settings related to PC backups, including the backup time window (12:00 a.m. to 6:00 a.m. by default); how much time to retain monthly, weekly, and daily backups; and so on.
- Passwords: Windows Home Server requires very strong passwords by default, because malicious hackers accessing the server over the Web could gain control over the system, and thus over all of your valuable files and, potentially, other PCs on your network if they were able to brute-force attack their way past a weak password. That said, you can change the password policy here if desired. We don’t recommend it.
- Windows Media Center: New to PP2, Windows Home Server can automatically configure Windows Media Center on your connected PCs to “see” the media shares on your home server. There’s no interface to the Windows Media Center tab in Windows Home Server Settings per se, but rather some information about the update. But when you run Windows Media Center on a connected PC for the first time, you’ll see the prompt shown in Figure 10-14. Click OK to install the Windows Media Center Connector.

- Media Sharing: Windows Home Server can share digital media files via default Music, Photos, and Videos shared folders. This interface uses standard Windows Media Connect technology to do so, so if you enable this sharing, PCs and compatible devices on your network (e.g., an Xbox 360 or other Windows-compatible digital media receivers) will “see” the Home Server shares and be able to access that content over the network.
- Remote Access: In this important and sometimes confusing section, shown in Figure 10-15, you can turn on the Home Server’s Web server, configure your home router for remote access and Web serving, and configure your custom domain name (something.homeserver.com).
Microsoft maintains a list of Windows Home Server add-ins on its Web site (www.microsoft.com/windows/products/winfamily/windowshomeserver/ add-ins.mspx) but there’s a better list on the Home Server plus Web site (www.whsplus.com).
- Resources: This last section acts as an About box for Windows Home Server.
- Other settings: Depending on how you acquired your Windows Home Server, you may see other settings listed in this dialog. For example, the HP MediaSmart Servers we use have additional settings that are unique to HP’s hardware; and some Windows Home Server add-ins place their own link here as well.

Windows Home Server includes a superset of this functionality, and it does so at no additional or annual cost. Thanks to the Windows Home Server remote access features, you can access the home server as well as most connected PCs in your home network using a simple and effective Web interface.
 Note the word most there: due to limitations of Microsoft’s home-oriented Windows versions, you can only remotely control PCs on your home network running Windows XP Pro or XP Tablet PC with Service Pack 2 or higher, Windows Vista Business, Enterprise, or Ultimate, or Windows 7 Professional, Enterprise, or Ultimate.
Remote access consists of three related features:
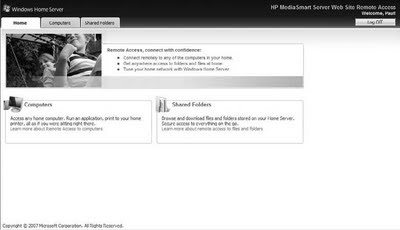
- Windows Home ♦♦ Server shared folders: The contents of any folders that are shared from Windows Home Server, such as Music, Photos, Public, Software, and Videos, as well as any other folders you’ve shared, are accessible via the Web interface, shown in Figure 10-20. There’s even a Windows Live Search box to help you find exactly what you need.
- Connected PCs ♦♦ PCs that are connected to Windows Home Server can be remotely
controlled, similar to the way you can control a Windows client or server using
Remote Desktop. Obviously, the experience can be fair to middling depending
on your connection speed, but it’s still great to be able to do this with desktop
machines when you’re on the road. - Windows Home Server Console ♦♦ You can also access the Windows Home Server Console when you’re online but off the home network. The management experience is identical to when you’re connected locally, aside from potential speed issues and the fact that the console appears within the browser and not via the traditional console window.

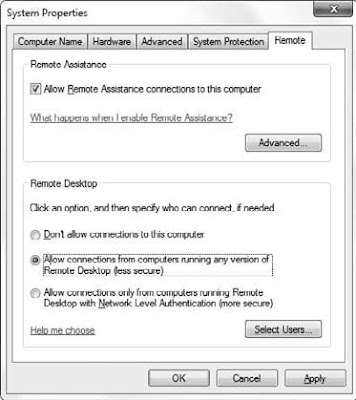
To enable remote access to specific PCs, you need to do a little work on each PC, as there’s no way to make it work using just the Windows Home Server Console. On a Windows 7–based PC, open the Start menu, right-click Computer, and then select Properties. Then, click Remote Settings located in the left pane of the System Properties dialog that appears. Under Remote Desktop, select Allow connections from computers running any version of Remote Desktop (less secure), as shown in Figure 10-21. If you choose the more secure option, it won’t work.
Once remote access is up and running, Microsoft (or the PC maker from whom you purchased the server) will give you a free custom URL like something.homeserver.com where something is replaced by whatever name you prefer. Then you can access your home server resources from the Web using a standard Web address.Summary
While Windows 7 is an excellent solution for standalone PCs, you must look to additional tools if you want to manage multiple PCs on your home network from a central location. Microsoft offers such a solution in Windows Home Server, which is typically obtained with new home server hardware but can also be purchased separately. Windows Home Server provides four basic services: centralized PC backup and restore, centralized PC and server health monitoring, document and media sharing, and remote access. The combination of Windows 7 and Windows Home Server provides a comprehensive management suite suitable for any home network.
+android+porn+app+sex+%5B4%5D.png)


0 komentar:
Posting Komentar