Race Driver GRID 2008

Race Driver: Grid (stylized as Racedriver GRID, in the Americas, known simply as GRID) is the most recent addition to the TOCA Touring Car series.

Doom 3: Resurrection of Evil Game Guide

Doom 3: Resurrection of Evil is a first-person shooter video game developed by Nerve Software and id Software. It was released for the PC on April 3, 2005, as an expansion pack for Doom 3 and on October 5, 2005, for the Xbox video game console.

Games PC; Art Of Murder: Deadly Secrets Final Portable

New Yk city was beaten with a series of murders and the death toll mounting. FBI Agent Nicole Bonnet F to find an advantage it has become impossible as it seems that the victims are all antiques and collects and unrelated to the other.

Air Conflicts: Secret Wars 2011

Air Conflicts: Secret Wars is an arcade flight simulator set for World War II scenario +. During his seven campaigns, the player must fly and fight with more than 48 missions.

Tips for Travel Packing

When planning to take a trip, the hard task is packing all the things that you really need and leaving the things that you want. To make your travel packing a whole lot easier, here are a few helpful tips that should help you:

Sabtu, 30 April 2011

Tutorial Photoshop; White hand Type


In this tutorial I will teach you how to make a photo-realistic rendering of a picture using Photoshop. You will learn how to lay down type in Photoshop, using various effects to create a 3D look from your image. By eliminating the need for different colors to be used as texture, this tutorial focuses on making an image “pop” out of what is really just a bunch of text in different shapes in the same color. By the end of this tutorial, you should be able to apply this knowledge to any image, and create unique text art that is entirely your own.


Step 1

First you need a stock image you can lay your text on. A common technique for Illustrator users is to draw their designs on paper, scan it in, and trace/
draw directly on top of the image in the program. We are going to take the same approach with a stock image. After finding your stock photo, open
it up in Photoshop. You are going to want your image size to be high enough that you can see the details of the photo, but low enough that you don’t get lost in the image while laying your text down. For me, about 800 pixels wide or tall is best. To change the size of your image go to Image>Image Size and select 800 pixels in either the wide or tall text box. Make sure Constrain Proportions is checked in the bulleted buttons, or your image will stretch. I also turned my image sideways to the way I wanted it by going to Image>Image Rotation.
Step 2

Create a solid background of your choice. Mine is a lime green color. I made a new layer and used the Paint Bucket Tool located under the Gradient Tool.
Step 3

Turn off visibility on your new background. Create a new layer and type out your text with the Horizontal Type Tool. Click your Move Tool. Hold down [ctrl]+[T] (or [command]+[T] on a Mac) to Free Transform. Roughly size it down to about the size of the space you want the text to fit in. Now select your text with the Horizontal Type Tool and click Create Warped Text. Choose a style and modify how it looks to your liking. I chose Arc, and set it to +19% on Bend. Hit OK and use Free Transform to resize and rotate the image to where you want it.
Step 4

Repeat this process by following the contours of the image underneath. Keep consistent with the inner shapes of the background only deviating from size/shape every so often to make a word pop from the shapes at a distance. Don’t be afraid to get the type real tiny either, even if you can’tread it at actual size. Every so often, click on the visibility of your solid background layer and look at it from a distance. The more the type blends together to show an image, the better.
Step 5

A good design element is to let text go off the canvas. In this piece I’ve created depth by simply making the type larger on the arm, than the palm or anywhere else.
Step 6

Pay attention to negative and positive space! How tightly you pack the type or how much space you put between elements is important. This space counts as a shape in its own right.
Step 7

Some tips: The Bulge style in Warp Text is perfect for cylindrical shapes while the Arc, Flag, and Rise styles are great for outlining and curvy shapes. Hold down your spacebar while using a tool besides the Type Tool to turn your cursor into the Hand Tool whenever you need to quickly click and drag your canvas around. Now fill up all that space with the same curves and shapes on the image.
Step 8
08 Once you’ve filled up the original image with type, turn on the solid background you made earlier. I added a white inner stroke to blend into the type bleeding off the page in Layer Style>Stroke. And you’re done! Save as a .jpg, or whatever image file type you prefer.

Tutorial Photoshop; Secret Place


Usually I get inspired from my own feelings, for example, my dreams, memories, or when I’m missing somebody. My favourite work, Secret Place, was one piece that came from my own experiences. I have spent a lot of time on swings with my best friend Rose and have been swinging on my own, lonely, since losing her. I decided to make a piece of art featuring swings with solitude as the theme, since that’s also my favourite subject. An important thing for me while I’m creating art is to show deep emotion and make the image realistic-looking. I must say, it’s hard to create a melancholic atmosphere. I find that atmosphere, well-shown feelings, and great colours are the most important things in art.


1.Choice of Stock
We have to look for stock that is easy to cut and manipulate with good contrast and lighting. I know it’s hard to find the perfect one but it’s also a funny process because some stocks can inspire you even further. Secret Place is about a lonely girl who is doing what she likes: swinging. To portray sadness, I was looking not for the swing, but for a model who had a sad face. It’s not hard to find perfect stock images when you know the exact type of stock you need. The girl for this piece had to be lonely, sad, and abandoned. To portray loneliness, I decided to look for a deep forest because forests have something magical about them and there’s a great sense of silence to them, so you can relax and think about several things while you’re alone. I thought that pairing the swing and the sad girl together with a forest would look wonderful. I’ve picked these images to use:

2.Making a New Document
I prefer to work on a 1300px x 2000 px canvas because when you finish your work and resize it to something smaller, your small mistakes will disappear because the image will lose some quality as it shrinks. After making new document and opening all the stock images you’ll need, move them to your canvas. To begin your first composition, lower the opacity level of your stock images and move them around and play with resizing options, rotation, and anything else you want to do. This process is something like sketching down our first ideas as we put together our concept. At first, change the opacity of the stock image featuring grass and flowers to about 30-40% and move it to the bottom of your layers panel. Now we have an idea of where we’re going, a bit of composition:

3.Blending
Manipulating and blending images together is the thing I like the most. Whenever I need to cut out and blend stock images, it’s a challenge for me. I get more experience whenever I blend. I always have to think about ways to cut the images or come up with ideas for how to blend or hide something.To blend images together, I usually use masks. I find masks to be very comfortable tools. It’s easy to edit our blending: we can change anything whenever we want. It’s not like the Eraser Tool when you want to change something after two hours of work; it’s almost impossible to do quickly.
Make a new mask with your grass stock. There’s a button at the bottom of the layer panel (You can also go to Layer>Enable Layer Mask. A small white rectangle will appear on your stock layer; press it.To blend large images, I usually pick a large soft brush (Hardness set to 0% and 300px) and set it to black. Next, paint over your grass stock. As you do, you should notice that the black brush is working as an eraser. If you would like to change something (For example, blending), change the colour to white.
Now, hide the unnecessary area of grass, like this:

Set the opacity of this layer to 40% and hide the grass from the girl’s body and the swing. Change your brush to about 15px and the hardness to about 75%. Zoom in at least 300% and start blending carefully. It can take some time, but the model need to be perfectly cut out. When you’re done, set the opacity back to 100% and look for mistakes, then fix them with the white colour.

4.Blending the Forest
Now it’s time to manipulate and blend our beautiful forest. At first, we have to move, transform, or resize the forest to see what will look best with the other stock images.
Open your forest image and move it onto the canvas. I resized and moved mine around until it was the way I wanted it. At this time, we must repeat Step 3. We must blend the forest and girl together. Create a layer mask and set the opacity to 40% on the forest layer. Start blending with the black brush (hardness: 75%). Do not blend the chain; we’ll do that later. Blending images together isn’t a very nice experience unless you know how to blend them well.When we are done, duplicate the layer to be safe and hide it (click on the eye next to your layer’s name.

Take a large soft brush (Hardness: 0%, 350px) and start blending the forest with the grass. The result must be soft. Here we can see that the image doesn’t look that good. We need do something with these areas: [Img9.jpg]. I think the best way to make it better is to use the Stamp Tool. I copied fragments of grass stock. Take the Stamp Tool and click on the grass layer, copy some grass, and fill in your holes until it looks something like this:

5.Setting the Colour of the Forest
It’s hard to chose the correct colour for your artwork because there are so many sets of colours. I wanted to make this scene magical and was wondering whether to use blue, orange, or green. Finally, I decided to pick a sharp, warm shade of green, which, I think, turned out to be a good idea. The green colour is nice on the eyes and can help the viewer relax. As you know, we can change our image colour in different ways depending on what result we want to achieve. Doing this piece,
I used several Variations because this tool is easy to use and you can see the final effect immediately. Before each step, I usually duplicate the layer and hide it so I can go back to it later. By doing this, whenever you want to go back to your original image/layer, you’ll always be able to. To use Variations, go to Image>Adjustments>Variations. In these small thumbnails, you can see your layer in
various different colours. Now, click on the yellow colour three times.
Go back to your Blend Modes and choose Gradient. I pick out a warm yellow (#e6cb6c). Set your gradient to Line, scale it to about 108% with a 90° angle. Set this layer to Blend Mode>Colour and change the opacity to 50%. As you can see, the forest and the grass have the same tones now. Setting the same colours and tones to your images is another form of blending.
6.Blending the Chain
I think this is the hardest step of all. You need a lot of time and patience to blend this chain well. Of course, you can also download chain brushes from somewhere or stamp in parts of the chain. I like experimenting and getting more experience, so I did it manually, without using brushes or the Stamp Tool. It took a long time, but now it looks great. Turn on your forest layer, set the opacity to 40%, and click on mask. Choose a black brush with a hardness of about 80%, sized at 4-5px. Now you have to be careful. Start blending the chain; if you have a tablet, the process will be faster. I know it’s hard, boring, precise work, but by doing it this way, the final effect will look more natural than, for example, using a chain brush. When finished, zoom in about 200% and look for mistakes, then zoom out to 100% and see if it looks good. If so, move on to the next step.

7.Lights and Shadows
Well-done lights and shadows are the most important things in art. If you want to make artwork look realistic, you have to set these correctly. Light should be in the middle of the work so our eye will keep looking at the piece longer because it will be more interesting. Look at the forest stock. There’s really strong light already. Let’s use that light and make it more powerful. Everything I do goes onto a new, titled layer. I like having everything in order.
Set your brush colour to white and load some light/rays brushes from the stock pack. Look for one good brush. I used this one, but light from the top of forest should have a different angle.
Go to Edit>Transform>Horizontal and resize its height. Some of this ray should be on the head of the girl as well. After that, go to Filter>Blur>Gaussian Blur and set the radius to about 3px (Before, it was too strong and sharp). Now, go back to your swing and model layerand duplicate it [Ctrl]+[J], then choose the Dodge Tool. Set the Dodge Tool to fight shadows and exposure at about 20-30% and start making model lighter, such as I did on image below.
Set the burn tool exposure to 20% and make little shadows on her stomach, near her knees, and onher face. With lights and shadows, this image looks much better.

8.Making the Model Better
I was thinking about what I should change with my model. I thought that longer hair would look better; personally, I like long, dark hair. Next, I wondered
how to add some hair: Should I should paint the strands or use brushes? I decided to look for a good pack of hair brushes. It wasn’t hard to find; there are so many types of brushes to choose from. Now that we have our brushes, make a new layer titled Hair and load the hair brushes from our stock pack. Set theforeground colour of your brush to light brown and the background to dark brown, then brush some
hair onto your layer and switch colours, making something like layers. By doing it this way, our hair will look more natural because it’s normal to have highlights. When you’re done, take a soft eraser and delete some parts of hair to create a soft blend between her original hair and the brushes. Set the opacity to 50% and delete the hair from her face, then go back to 100% opacity.
Now you can see that her face and the top of her head are a little grey/white. Make a new layer, then choose a soft brush and warm brown colour. Personally I used #866b3b. Brush her face, then go to Blend Mode and set the layer to Soft Light. Next, make another new layer and pick #583e10, then paint the top of her head, set the layer’s Blend Mode to Multiply, and give it an opacity of about 40-50%, whatever you like.


Information and Credits for stock used:
  • Swing & Model by dazzle-stock http://dazzlestock.deviantart.com/art/Depressed-95857052
  • Forest by umbradenoapte-stock http://umbradenoaptestock.deviantart.com/art/Stock-10-80055109
  • Nature Pack by resurgere http://resurgere.deviantart.com/art/Package-Nature-2-8563778
  • Hair Brushes by falln-stock http://fallnstock.deviantart.com/art/Hair-Brushes-Set-6-92731728
  • Light Brushes by redheadstock http://redheadstock.deviantart.com/art/Light-Beams-Rays-Brushes-72493128


9.Final Colours and Editing
Finally we have a perfect scene. Everything is blended correctly, so we are almost done. Let’s make our image more colorful. Colour is the second-most important thing when we are creating art because we have to decide which one and what tone, then choose blending options, etc. As I said before, I decided to make this piece a lively green. It should make our work seem magical and mysterious. Go to Blending Options and click Color Overlay. Look for a warm yellow color again (#d8c43a), then press ok. Set the Blend Mode to Soft Light and the opacity to 50%. Now our picture is warm and easy on the eyes. We can see that the forest is more yellow and the grass is greener. To fix this, go to Blending Mode again and choose Gradient. Using the same colour, set the Blend Mode to colour and the opacity to about 50%. Go again to Blending Mode and choose Selective Colour.
At the top, you can see the names of various colours such as green, yellow, white, etc. We want our picture to be more yellow and less green. Click Green and make it more Yellow (65%), then set the Cyan to 55%. I won’t detail all the settings I used; you have to try them out on your own. Choose the colours you like the best, be a little self-dependent. Do several experiments with this tool because Selective Colour is a really interesting and helpful tool whenever you need to change your colours.
Finally, one thing I don’t like is this strong light, so let’s change it. Make a new layer and take a hard brush and. Copy the color from the top of your forest and paint something like this:

Next, go to Blur Gaussian Blur and set the Radius to about 95px. Set your opacity to 45-50%. I think it looks better now. If you want, you can crop this image and make it smaller. Personally, I usually crop and resize to reduce the size of my artwork once I’m finished everything else.

Tutorial Photoshop; Restoring The Past


From this tutorial you will learn how to restore an old photo and take care of the faded areas as well as color balance.


Step 1
With the original photo in hand we can see that it is faded and color aged, with minor problems with risks and scratches. Here we have a photo from 1977, taken in south of Brazil.

Step 2
Now, for questions of fidelity we are going to keep the original photo and start adjusting the faded photo. You can use the Fade Correction
Adjust at will, but keep in mind that in some cases it will dark the image. Therefore, we use here a level of 45 to get the faded colors better. Adjust>color>fade correction>amount 45.

Step 3
Than, we can use an effect that will sharp a lithe and improve brightness of the image. Take care to use it; a higher amount of this effect will get the
photo too sharp. I used an amount of five in this case, it gets a good effect and do not affect the original aspect of the photo. Adjust>Brightness and Contrast>Clarify>amount 5.

Step 4
A little bit of Contrast and Brightness. A value of 10 of each will be good enough. Adjust>Brightness and Contrast>Brightness/Contrast>amount of brightness 10 / amount of contrast 10.

Step 5
Lets remove some minor specks of the image with the Salt and Pepper filter. In many cases a low value will be good enough. Adjust>Add/Remove Noise>Salt and Pepper Filter…>Speck size (pixels) 10/Sensitivity to specks 2.

Step 6
We are almost finished here; we can adjust the color to be a little bit warmer using the color balance option. I used here a preset adjust. Adjust>Color
Balance…>Settings>Fluorescent
– Cool (4300K) So here, it is, you do not have to change many physical aspects of the image using tools like the clone tool, we used just some filters and that is the result. Keep in mind that the restoration of old photos needs to change just a few things to keep it as an original photo, not a photoshoped one.

Tutorial Photoshop; Extreme Retouching


This retouching is a simple example of the power that has photoshop on how you can bring out the best of the beauty of a person. In this tutorial we will show simple techniques of retouching using the tools most popular of Photoshop.


Step 1
First of all, duplicate background layer and call it healing brush. Select from the tool's panel the spot healing brush and use it to remove all the imperfections of the skin included spots and little wrinkles. Also you delete the hair in front of the eyes.

Step 2
After we cleaned her face,duplicate the healing brush layer and select lasso tool by the tool's panel . With lazo, make a rough selection of the eyebrow and apply free transform by the menù modify/free transform or by the shortcut ctrl+t. Resize the eyebrow intervening on the transform controls; In this case, move down the higher and lift up the lower transform control (indicated by the arrow) and click on the selection to move the eyebrow and reposition it. Press Enter to confirm and press Ctrl+D to clear (deselect) the selection. Duplicate the healing brush layer again and merge it at the eyebrow layer. Now,using clone stamp and healing brush tool, cleaning the old. eyebrow and make uniform the skin around (img 1-2). Repeat the same procedure with the other eyebrow.(don't worry about the hair on, because they cover it later).

Step 3
Duplicate the healing brush layer. Start from the hairs, select the clone stamp tool and using the these values, diameter 80px e hardness 50% , Consider as source a part of thick hair,and cover these hair to get a similar result (img.3). Now make his teeth more regular using clone stamp tool with a small diameter (5px for example) and opacity about 85%(img.4). When we have reached a good results, remove circles with clone stamp tool(img.6), being attention to get a natural and homogeneous result.

Step 4
Duplicate the eyebrow copy layer and rename it liquify. Open from the menu bar Filter/liquefy (shortcut Maiusc+Ctrl+X); select plucker tool (s), and with a enough size of brush ( 205px for example) make the nose slightly small, giving like short shots with brush over the entire length of the nose. Using the bloat tool (b), reduce the brush size (90px for example) and give more volume to lips.

Step 5
Duplicate the liquify layer and call it smooth skin. Go in Filter/noise/dust and scratches and set the radius about 10 pixel and press ok. Now go in Filter/Blur/Gaussian Blur, and set the radius about 10 pixel, and press ok.

Step 6
Now go in menù Layer/layer mask/ hide all, it will be created a layer mask filled of black at our layer that it will hide the filters applied.So select the brush tool and set "foreground color" on white than set the opacity of brush tool with approximate values (60% for example) and begin "to paint" (with the mask selected) only on the skin excluding also hair,eyebrows,eyes, ecc. We'll see to back top the filters applied before. Using a lower opacity paint also on the lips to smooth it.

Step 7
Now we need to emphasize the eyes using the dodge and burn tools. Duplicate the liquify layer and rename it eyes Select the dodge tool from the tool's panel and set Range in Highlights, Opacity until 30%-40% and we choose a diameter that fits the eye (see the figure). So paint the inside of the eyes to make them brighter. Now select burn tool with a small diameter (6-7px) set an opacity about 10% and paint the edge of the iris to darken it.

Step 8
Now apply just a little bit of make up. Create a new layer (Maiusc+Ctrl+N) and we have to make sure that it is in top of the other layers. Select the brush tool, choose a dark color and set the opacity at 100%, painting on her eyelid like if you put on the eyeshadow; now apply a few of Filters/Blur/ Box Blur on this layer choosing like values 4px or 6px (in this range). At the end change the blending mode of the layer on Soft Light (you can try also Moltiply or Color) and reduce layer's opacity. Repeat the same procedure for the other eye and, if you want, also to add phard on the cheeks (but in this case we need to choose a higher value for a blur) and lipstick, creating a new layer for everything and choosing the colors that you prefer. This is my version:

Step 9
now retouch the brightness and contrast. Create a new layer from the menù bar: Layer/New adjustment layer/Curves, you can give a name at the layer and click Ok. Choose from a Preset Menu "Linear Contrast" and press Ok. So duplicate the "eyes" layer and go in Filter/Sharpen/Unsharp Mask.. and set this values: Amount=35%; Radius=5px; Threshold="0"; and press Ok. Go in menù Layer / Layer mask /hide all and now retouch the brightness and contrast. Create a new layer from the menù bar: Layer/New adjustment layer/Curves, you can give a name at the layer and click Ok. Choose from a Preset Menu "Linear Contrast" and press Ok. So duplicate the "eyes" layer and go in Filter/Sharpen/Unsharp Mask.. and seti this values: Amount=50%; Radius=5px; Threshold="0"; and presso Ok. Go in menù Layer / Layer mask /hide all. Select the brush tool and set as foreground color "white" and paint on the eyes to sharpen.
The end.

Jumat, 29 April 2011

LADY GAGA SAYS: “I’M RETARDED”


NEW YORK - Lady Gaga is being sued by Madonna for plagiarism. Gaga’s explanation: “I’m retarded.” Lady Gaga is being accused of plagiarism for her song “Born This Way” and the comparisons to Madonna’s hit “Express Yourself.”


Here’s Madonna expressing herself:


Madonna, who says she likes Lady Gaga, was quoted as saying, “that stupid bitch stole my song.”

Surprisingly, Lady Gaga admitted that she not only stole parts of “Express Yourself” for her song, but she is trying to steal everything about Madonna. “I want to be Madonna, just younger.”

Lady Gaga told WWN, “I’m a songwriter. I’ve written loads of music. Why would I try to put out a song and think I’m getting one over on everybody? Because… I’m retarded! I’m stupid and I do stupid things, get over it!”


Gaga went on to say, “If you put the songs next to each other, side by side, you can hear the similarities are not just the chord progression,” she continues. “I tried to steal her melody and her vocal style. I’m a plagiarist, it means I’m f****** retarded.”

If you’re a moron, raise your hand:


Lady Gaga confirmed that does not have any hate for people with mental or physical disabilities. The r-word is just something people say without thinking. “And I’m retarded, so I don’t usually think,” Gaga said.

She’s also getting criticism, this time from religious groups, over her new song, “Judas,” told from the point of view from Mary Magdelene.

“I feel like honestly that God sent me those lyrics and that melody,” Gaga shot back, getting emotional. “When you feel a message to give to the world and people are shooting arrows through it … there’s no way for something that pure to be wrong.”

The conservative Catholic League disagreed, though they’ve also lashed out at her music video, which hasn’t even come out yet.

“Leave me alone… I’m retarded!” Gaga said.

WeeklyWorldNews

Complete Your Home Network with Windows Home Server


Windows 7 is Microsoft’s most impressive desktop operating system to date, but in today’s world, few users actually access a single PC. In addition, you use online services, have portable devices such as smart phones and portable media players, and manage home networks with two or more PCs, some of which are laptops and other mobile computers. Throughout this book, we’ve tried to maintain this sense of perspective, because Windows 7 doesn’t exist in a vacuum. Instead, it’s part of a complex and growing electronic ecosystem of products and services. That’s why we also cover Zune, Windows Mobile, and Microsoft’s Live services in this book. They’re all interrelated. But if you’re looking for one product that can really simplify the management of a multi- PC home, Windows Home Server has no peers. Don’t let the name scare you: though this product is indeed based on Microsoft’s enterprise-class servers, Windows Home Server is designed for home users, and it is surprisingly easy to use, given its vast capabilities. In this chapter, we’ll examine Windows Home Server, Microsoft’s solution for the multi- PC home.


In late 2007, Microsoft’s PC maker and hardware partners began shipping specially designed home server products based around a new operating system called Windows Home Server. Code-named “Q” (and previously code-named “Quattro”), Windows Home Server is just what its name suggests, a home server product. It provides a central place to store and share documents, along with other useful services for the connected home.
Truth be told, Windows power users don’t have to buy a prebuilt home server to get Windows Home Server, though we’ve both had excellent results doing so ourselves. Instead, if you’d like to purchase just the Windows Home Server software and install it on your own PC-based server, you can do so. Just visit an online electronics retailer such as Newegg.com and search for Windows Home Server. The software typically costs less than $100 in the United States.

Windows Home Server Evolution
In addition to Microsoft’s work on Windows Home Server, some key hardware partners have been working over the years to steadily improve their Windows Home Server machines with innovative hardware designs and interesting software solutions that extend core functionality through high-quality add-ins. Key among these is HP, whose MediaSmart Server line has proven to be the customer favorite in the United States, and for good reason: these machines consistently provide an even better experience than the stock Windows Home Server experience documented here. And yes, both Paul and Rafael rely on HP MediaSmart Servers in their own homes. These are excellent servers.
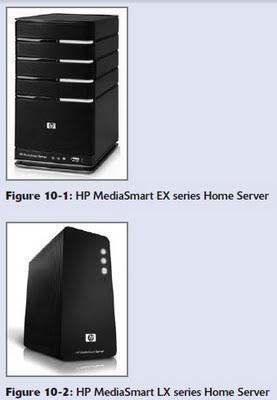
HP currently markets two different MediaSmart families of servers. The high-end MediaSmart EX series is the mainstream Home Server and supports multiple internal hard drives. It’s shown in Figure 10-1. The HP MediaSmart Server LX series, meanwhile, is a one-hard-drive option that is aimed at the low end of the market. Shown in Figure 10-2, these servers can be expanded externally.

Windows Home Server Installation and Configuration
Depending on how you acquire Windows Home Server, your one-time install and initial configuration experience will either be long and reasonably difficult or long and reasonably easy. Those who purchase new home server hardware will have the simpler—and likely superior—experience, but configuring the server is a time-consuming proposition in either case. That said, it’s a one-time deal. For the most part, you’ll install the server just once and then access it remotely occasionally after that.
Some PC makers, notably HP, have gone to great lengths to make the Windows Home Server initial setup experience much easier than the Microsoft default. See Paul’s reviews of HP’s MediaSmart Servers on the SuperSite for Windows www.winsupersite.com/server to see what we mean.

You may not be surprised to discover that you can bypass the Windows Home Server administrative console and access the bare-bones operating system if you know the trick. Here’s how it works: on a Windows 7–based PC, launch the Remote Desktop Connection utility (type remote in Start Menu Search), type the computer name (hostname) of your home server into the Computer field (typically something like HOME-SERVER), and supply the name administrator as the user name and the password for the master account that you configured during home server setup. Ta-da! You can now access the Windows Home Server Desktop, shown in Figure 10-3, just as you would any other computer. Note, however, that Windows Home Server is designed to be used remotely via the console, and not interactively, so be careful about installing software or making other changes via this remote desktop interface.

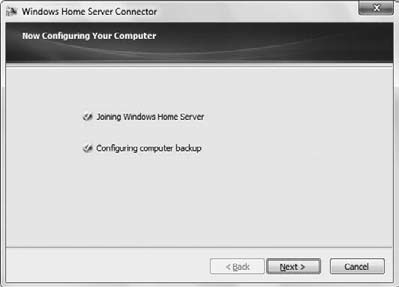
The initial configuration of Windows Home Server involves first installing the Windows Home Server Connector software, which comes on its own CD, on a client PC running Windows XP with Service Pack 2 or 3 or any version of Windows Vista or 7. (You can also access the Connector software via your home network; it can be found at \\{computer name}\Software\Home Server Connector Software\ by default.) The installer will “join,” or connect, your PC to the server (see Figure 10-4) for later backup purposes and then complete the setup process.

As is the case with any other PC-like network resource, you must log on to the Windows Home Server in order to access it remotely, and that’s true regardless of how you plan to access the server (via shared folders, the administrative console, or the Connector tray software). While it’s possible to maintain different logons on your PC and the server, it’s simpler to make them identical. That way, you will automatically and silently log on to the server every time you need to access it. In fact, Windows Home Server will prompt you to do this, as shown in Figure 10-5, if the passwords don’t match. Note, too, that if you configure Windows Home Server for remote access (detailed later in this chapter), the passwords you use need to meet minimum length and complexity guidelines, for your security
Admin Console Drive-By
You can launch the Windows Home Server Console from the Windows Home Server Connector icon in the taskbar notification area. (Remember that Windows 7 will hide this icon under “Show hidden icons” by default.) This icon is a colored square with a white home on it.
Companies that sell prebuilt Windows Home Server solutions, like HP, often include other tabs in this interface. These tabs expose functionality that is unique to those products.

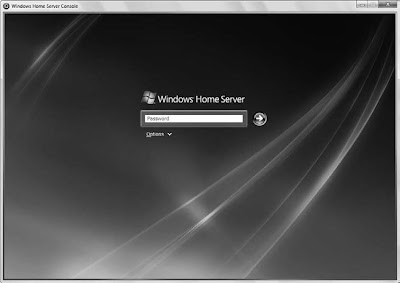
The Windows Home Server Console logon interface

The Windows Home Server Console presents a simple, multi-tabbed user interface.

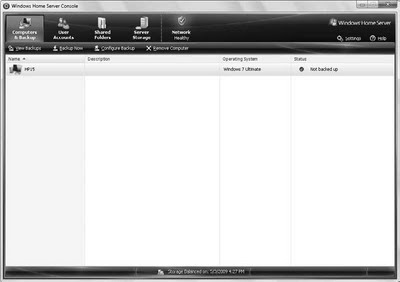
The following sections describe what’s available in every Windows Home Server Console user interface, regardless of how you obtained the server.
Computers & Backup
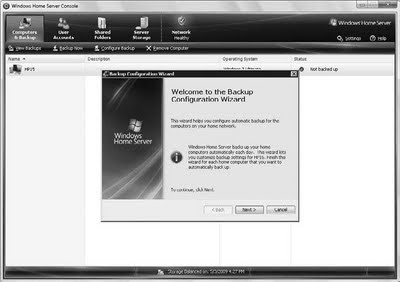
To configure backups on a PC-by-PC basis, navigate to the Computers & Backup interface in the Windows Home Server Console, right-click the PC you’d like to manage, and choose Configure Backup. The Backup Configuration Wizard shown in Figure 10-8 will appear, enabling you to choose which disks to back up and other details related to the process.
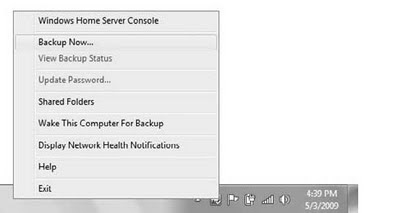
You can manually trigger a backup from the Connector tray icon on the client PC (as shown in Figure 10-9) or from within this interface. (Using the tray is much faster than waiting for the admin console to load, of course.) You can even trigger backups from other PCs if you’d like. Remember: Windows Home Server is all about central management of your PCs, so you’re free to trigger backups and other activities from any PC that has access to the Windows Home Server Console.

You can also trigger backups from the Windows Home Server Connector tray icon on your PC.

User Accounts
In the User Accounts tab, you can create user accounts that allow individuals to access various features of the server. By default, there is a guest account (disabled), but you will typically create accounts that map to accounts on the PCs you use, and thus to people in your home.

If you want to provide remote access, you need an even more complex password; and you can, of course, specify which users can access which shared folders (described in the next section). That way, your children, for example, could have access to certain shared folders but not others that you want to keep private.
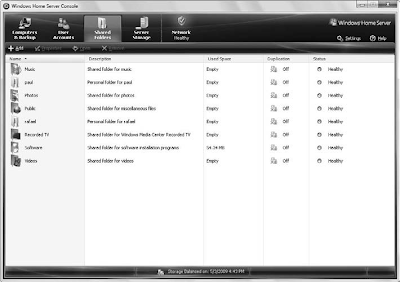
Shared Folders
Here you’ll see all of the shared folders that are configured on the server, along with a simple Duplication option for each. This option specifies whether data in that folder is copied to two hard disks for reliability purposes. (Note that you must have at least two physical hard disk drives in the server to access this feature.) You can add and configure shares from here and determine access rights on a user-by-user basis.
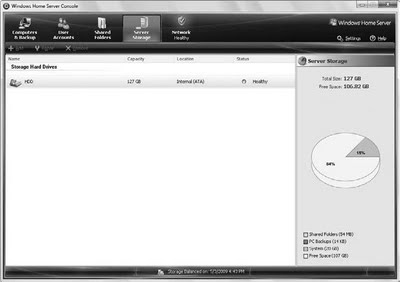
Server Storage
This section of the Windows Home Server user interface lists all of the hard drives currently attached to your server, whether or not they’re configured for use by the server, and other related information, as shown in Figure 10-12. You can add new storage to the server here or repair a hard drive that’s encountering errors. (When this happens, you’ll see a health alert in the Windows Home Server Connector tray icon on each connected PC.) You can also remove a hard drive using this interface if necessary.

Server Storage shows which drives are configured for use with the server and how storage is allocated.

Setting
The inconspicuous little Settings link in the upper-right corner of the Windows Home
Server Console opens the most complex UI you’ll see here, as shown in Figure 10-13—a Settings dialog with eight sections by default, though preinstalled versions of the server may have more.

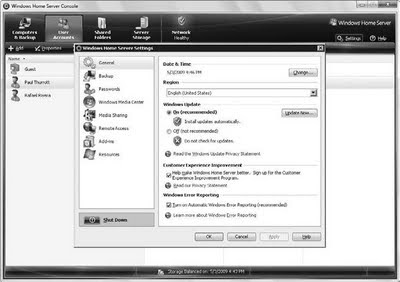
Default sections in the Settings dialog include the following:
  1. General: Configure date and time, region, Windows Update, and other basic settings.
  2. Backup: Configure various default settings related to PC backups, including the backup time window (12:00 a.m. to 6:00 a.m. by default); how much time to retain monthly, weekly, and daily backups; and so on.
  3. Passwords: Windows Home Server requires very strong passwords by default, because malicious hackers accessing the server over the Web could gain control over the system, and thus over all of your valuable files and, potentially, other PCs on your network if they were able to brute-force attack their way past a weak password. That said, you can change the password policy here if desired. We don’t recommend it.
  4. Windows Media Center: New to PP2, Windows Home Server can automatically configure Windows Media Center on your connected PCs to “see” the media shares on your home server. There’s no interface to the Windows Media Center tab in Windows Home Server Settings per se, but rather some information about the update. But when you run Windows Media Center on a connected PC for the first time, you’ll see the prompt shown in Figure 10-14. Click OK to install the Windows Media Center Connector.
  5. Media Sharing: Windows Home Server can share digital media files via default Music, Photos, and Videos shared folders. This interface uses standard Windows Media Connect technology to do so, so if you enable this sharing, PCs and compatible devices on your network (e.g., an Xbox 360 or other Windows-compatible digital media receivers) will “see” the Home Server shares and be able to access that content over the network.
  6. Remote Access: In this important and sometimes confusing section, shown in Figure 10-15, you can turn on the Home Server’s Web server, configure your home router for remote access and Web serving, and configure your custom domain name (something.homeserver.com).
    Microsoft maintains a list of Windows Home Server add-ins on its Web site (www.microsoft.com/windows/products/winfamily/windowshomeserver/ add-ins.mspx) but there’s a better list on the Home Server plus Web site (www.whsplus.com).
  7. Resources: This last section acts as an About box for Windows Home Server.
  8. Other settings: Depending on how you acquired your Windows Home Server, you may see other settings listed in this dialog. For example, the HP MediaSmart Servers we use have additional settings that are unique to HP’s hardware; and some Windows Home Server add-ins place their own link here as well.
Remote Access
Windows Home Server includes a superset of this functionality, and it does so at no additional or annual cost. Thanks to the Windows Home Server remote access features, you can access the home server as well as most connected PCs in your home network using a simple and effective Web interface.
Note the word most there: due to limitations of Microsoft’s home-oriented Windows versions, you can only remotely control PCs on your home network running Windows XP Pro or XP Tablet PC with Service Pack 2 or higher, Windows Vista Business, Enterprise, or Ultimate, or Windows 7 Professional, Enterprise, or Ultimate.
Remote access consists of three related features:
  1. Windows Home ♦♦ Server shared folders: The contents of any folders that are shared from Windows Home Server, such as Music, Photos, Public, Software, and Videos, as well as any other folders you’ve shared, are accessible via the Web interface, shown in Figure 10-20. There’s even a Windows Live Search box to help you find exactly what you need.
  2. Connected PCs ♦♦ PCs that are connected to Windows Home Server can be remotely
    controlled, similar to the way you can control a Windows client or server using
    Remote Desktop. Obviously, the experience can be fair to middling depending
    on your connection speed, but it’s still great to be able to do this with desktop
    machines when you’re on the road.
  3. Windows Home Server Console ♦♦ You can also access the Windows Home Server Console when you’re online but off the home network. The management experience is identical to when you’re connected locally, aside from potential speed issues and the fact that the console appears within the browser and not via the traditional console window.
In addition to all this great functionality, Microsoft has made it really easy to configure and use. By default, remote access is disabled, so you need to utilize the Remote Access link in the Settings dialog to first turn it on and then configure it. Enabling remote access can be either dead simple or utterly painful, depending on what kind of router you’re using on your home network. The trick is to use a modern, Universal Plug and Play (UPnP) router: Windows Home Server will automatically configure it for remote access, and all will be well. If you don’t have such a device, you need to manually configure your router using fairly technical instructions in the Windows Home Server help files.
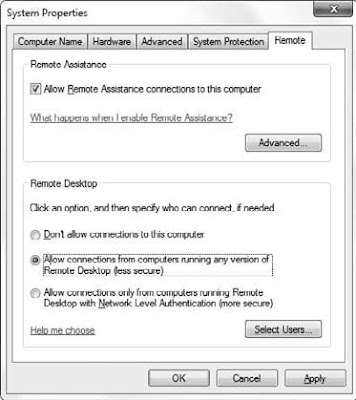
To enable remote access to specific PCs, you need to do a little work on each PC, as there’s no way to make it work using just the Windows Home Server Console. On a Windows 7–based PC, open the Start menu, right-click Computer, and then select Properties. Then, click Remote Settings located in the left pane of the System Properties dialog that appears. Under Remote Desktop, select Allow connections from computers running any version of Remote Desktop (less secure), as shown in Figure 10-21. If you choose the more secure option, it won’t work.

Once remote access is up and running, Microsoft (or the PC maker from whom you purchased the server) will give you a free custom URL like something.homeserver.com where something is replaced by whatever name you prefer. Then you can access your home server resources from the Web using a standard Web address.
Summary
While Windows 7 is an excellent solution for standalone PCs, you must look to additional tools if you want to manage multiple PCs on your home network from a central location. Microsoft offers such a solution in Windows Home Server, which is typically obtained with new home server hardware but can also be purchased separately. Windows Home Server provides four basic services: centralized PC backup and restore, centralized PC and server health monitoring, document and media sharing, and remote access. The combination of Windows 7 and Windows Home Server provides a comprehensive management suite suitable for any home network.